Color Controls
Color controls set the colors for different color components. You can set the color by clicking the color swatch to display the Color Selector.
Note: The Metal shader does not have a Specular component, because it generates the specular color automatically. The Multi-Layer shader can have two different Specular color components, so for this material the Specular color swatches are found in the Specular Highlights group. The Strauss shader has only a single color component, which corresponds to Diffuse.

1. Specular color
2. Diffuse color
3. Ambient color
When you drag and drop a color swatch, the Copy or Swap Colors dialog asks if you want to copy the color or swap the two colors.
In general, materials with two identical color components do not look realistic, and except for materials that are close to solid black, you should avoid using copied or locked color components in materials you use in a scene. Color copying and locking are best used as conveniences when you design a new basic material.
If two colors are locked, and you lock the other two, all three component colors are replaced by the active color.
While two colors are locked, adjustments to one color component affect the other as well.

Ambient
Controls the ambient color. The ambient color is the color in shadow (indirect light).
 The lock button to the right of the Ambient and Diffuse settings, when on (the default), forces them to use the same map.
Usually it makes sense to use the same map for the ambient and diffuse components. To use different maps, turn off the lock button. A map shortcut button for Ambient appears.
Turn off the![clip_image004[1] clip_image004[1]](https://blogger.googleusercontent.com/img/b/R29vZ2xl/AVvXsEjSCoV2ISUWnDGg9S2x4bWcd5atyTeuU88gej1Zeu7PS3Puu0oRN9npXW9UHPZ7hPf2WGZUQQnyz7rTUZVXC_6Mf9DM1N8Nca9eIBvRlyOl-DFb22Seqv0NOyR1kfngrUdaLHARlHaFfUmb/?imgmax=800) lock button and click the map button to assign an Ambient Color map. This button is a shortcut: You can also assign an Ambient Color map on the Maps rollout.
lock button and click the map button to assign an Ambient Color map. This button is a shortcut: You can also assign an Ambient Color map on the Maps rollout.
Diffuse
Controls the diffuse color. The diffuse color is the color in direct light.
Click the map button to assign a Diffuse Color map. This button is a shortcut: You can also assign a Diffuse Color map on the Maps rollout.
Specular
Controls the specular color. The specular color is the color of the highlight on a shiny object. You can control the size and shape of highlights in the Specular Highlights group, described below.
Click the map button to assign a Specular Color map. This button is a shortcut: You can also assign a Specular Color map on the Maps rollout.
The self-illumination color appears in viewports.
Note: The Strauss shader does not have self-illumination.
There are two ways to specify self-illumination. You can turn on the checkbox and use a self-illumination color, or turn off the checkbox and use a monochrome spinner, which is comparable to using a gray scale self-illumination color.
Self-illuminated materials do not show shadows cast onto them, and they are unaffected by the lights in the scene. The brightness (Value in the HSV color description) remains the same regardless of the scene's lighting.
To make a visible light source in a scene, you can combine a geometric object with a light object, and give the geometric object a self-illuminating surface. For example, you could create a lofted light bulb shape, assign it a self-illuminating white or yellowish material, and place an omni light in the same location.
To make a material both self-illuminating and transparent, use the Additive transparency type in combination with self-illumination.

A self-illuminated object using a percentage value and a color
The self-illumination color is mixed with the material's diffuse color. The closer to black the self-illumination color, the more diffuse color is used.
As self-illumination increases, the sample object appears flatter and more luminous.

Color checkbox
When on, the material uses a special self-illumination color. When off, the material uses the diffuse color for self-illumination, and displays a spinner to control the self-illumination amount. Default=off.
Click the map button to assign a Self-Illumination map. This button is a shortcut: You can also assign a Self-Illumination map on the Maps rollout.
Color swatch
When Color is on, the color swatch shows the self-illumination color. To change the color, click the swatch and then use the Color Selector. Adjusting the Value (in the color's HSV description) adjusts the amount of self-illumination. The greater the Value, the more the self-illumination color dominates both the ambient and diffuse color components.
Mono spinner
When Color is off, the diffuse component is used as the self-illumination color, and this spinner lets you adjust the amount of self-illumination. At 0, there is no self-illumination. At 100, the diffuse color takes over from the ambient color.

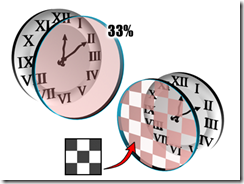
Controlling opacity using the Opacity setting (left) or an opacity map (right).
To preview transparency in the sample slots, view the sample object against a background. Click the checkered Background button to the right of the sample slots.
Transparent materials render more realistically when you turn on 2-Sided in the material's Shader Basic Parameters.

Opacity
Sets the opacity/transparency of the material as a percentage. The effect is best previewed against a pattern background in the sample slot. You can control opacity falloff in the Extended Parameters.
Click the map button to assign an Opacity map. This button is a shortcut: You can also assign an Opacity map on the Maps rollout.

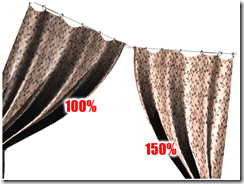
Adjusting diffuse level
Note: The Blinn, Metal, Phong, and Strauss shaders do not have Diffuse Level control.

Diffuse Level
Increasing this value increases diffuse brightness, and decreasing it reduces diffuse brightness without affecting the specular highlight. You can increase the diffuse level over and above the diffuse color's Value (in its HSV description). This parameter can range from 0 to 400. Default=100.
Click the map button to assign a Diffuse Level map. This button is a shortcut: You can also assign a Diffuse Level map on the Maps rollout.
Note: The Roughness parameter is available only with the Oren-Nayar-Blinn and Multi-Level shaders, and with the Arch & Design material (mental ray).

Increasing the blending area between ambient and diffuse with Roughness

Roughness
As you increase this value, the matte appearance of the material increases. It also grows darker and appears more flat. At 0, the roughness is the same as it is with Blinn shading. Range (Oren-Nayar-Blinn and Multi-Layer)=0 to 100. Range (Arch & Design material)=0.0 to 1.0. Default=0.
Click the button to assign a Diffuse Roughness map. This button is a shortcut: You can also assign a Diffuse Roughness map on the Maps rollout.
Warning: Do not use shadow maps with the translucent shader. Shadow maps result in artifacts at the edge of translucent objects.
Translucent materials render more realistically when you turn on 2-Sided in the material's Shader Basic Parameters. The translucent effect does not appear in shaded viewports.


The projection screen uses translucency

Translucent Clr (Color)
Specifies a translucency color. This is the color of light that is scattered within the material. It does not need to be the same as the filter color, which is light transmitted by the material. The two color values are multiplied. Click the color swatch to change the Translucent Color.
Click the button to assign a map to the Translucent Color component. This button is a shortcut: You can also assign a Translucent Color map on the Maps rollout.
Filter Color
Specifies a filter color that is multiplied by the translucent color. The filter, or transmissive color, is the color transmitted through transparent or semi-transparent materials such as glass. Click the color swatch to change the filter color.
Click the map button to assign a Filter Color map. This button is a shortcut: You can also assign a Filter Color map on the Maps rollout.
You can use the filter color with volumetric lighting to create effects such as colored light through a stained-glass window. Ray-traced shadows cast by transparent objects are tinted with the filter color.
Opacity
Sets the opacity/transparency of the material as a percentage. The effect is best previewed against a pattern background in the sample slot.
Click the map button to assign an Opacity map. This button is a shortcut: You can also assign an Opacity map on the Maps rollout.
Next >> 4.Specular Highlight Controls
Color controls set the colors for different color components. You can set the color by clicking the color swatch to display the Color Selector.
Note: The Metal shader does not have a Specular component, because it generates the specular color automatically. The Multi-Layer shader can have two different Specular color components, so for this material the Specular color swatches are found in the Specular Highlights group. The Strauss shader has only a single color component, which corresponds to Diffuse.

1. Specular color
2. Diffuse color
3. Ambient color
Copying and Locking Color Components
For convenience in changing color components, the Material Editor lets you copy one color component to another by dragging, and to lock two color components together with the lock buttons to the left of the Ambient and Diffuse, and Diffuse and Specular color swatches.When you drag and drop a color swatch, the Copy or Swap Colors dialog asks if you want to copy the color or swap the two colors.
In general, materials with two identical color components do not look realistic, and except for materials that are close to solid black, you should avoid using copied or locked color components in materials you use in a scene. Color copying and locking are best used as conveniences when you design a new basic material.
Procedures
To change a color component:- Click the color swatch next to the color component you want to change.
- Use the Color Selector to change the values of the color component.
To copy one color component to another:
- Drag the color swatch of the color you want to copy to the color swatch of the other color component.
- Click Copy to replace the second color swatch with the color you dragged. Click Swap to swap the two color components.
To lock two color components:
The Material Editor displays an alert that asks whether you want to lock the two color components.- Click Yes.
If two colors are locked, and you lock the other two, all three component colors are replaced by the active color.
While two colors are locked, adjustments to one color component affect the other as well.
To unlock two color components:
The two colors remain the same until you change either or both.Interface

Ambient
Controls the ambient color. The ambient color is the color in shadow (indirect light).
Usually it makes sense to use the same map for the ambient and diffuse components. To use different maps, turn off the lock button. A map shortcut button for Ambient appears.
Turn off the
Diffuse
Controls the diffuse color. The diffuse color is the color in direct light.
Click the map button to assign a Diffuse Color map. This button is a shortcut: You can also assign a Diffuse Color map on the Maps rollout.
Specular
Controls the specular color. The specular color is the color of the highlight on a shiny object. You can control the size and shape of highlights in the Specular Highlights group, described below.
Click the map button to assign a Specular Color map. This button is a shortcut: You can also assign a Specular Color map on the Maps rollout.
Self-Illumination Setting
These controls make the material self illuminated. Self-illumination creates the illusion of incandescence by replacing shadows on the surface with the diffuse color. As you increase self-illumination, the self-illumination color takes over from the ambient color. At a setting of 100, the material shows no shaded areas, although it can show specular highlights.The self-illumination color appears in viewports.
Note: The Strauss shader does not have self-illumination.
There are two ways to specify self-illumination. You can turn on the checkbox and use a self-illumination color, or turn off the checkbox and use a monochrome spinner, which is comparable to using a gray scale self-illumination color.
Self-illuminated materials do not show shadows cast onto them, and they are unaffected by the lights in the scene. The brightness (Value in the HSV color description) remains the same regardless of the scene's lighting.
To make a visible light source in a scene, you can combine a geometric object with a light object, and give the geometric object a self-illuminating surface. For example, you could create a lofted light bulb shape, assign it a self-illuminating white or yellowish material, and place an omni light in the same location.
To make a material both self-illuminating and transparent, use the Additive transparency type in combination with self-illumination.

A self-illuminated object using a percentage value and a color
Procedures
To make a material self-illuminating:- Click the color swatch in the Self-Illumination group.
- In the Color Selector, choose a color for self-illumination.
- Use the color's Value parameter (in the HSV model) to increase or decrease the amount of self-illumination.
The self-illumination color is mixed with the material's diffuse color. The closer to black the self-illumination color, the more diffuse color is used.
As self-illumination increases, the sample object appears flatter and more luminous.
Interface

Color checkbox
When on, the material uses a special self-illumination color. When off, the material uses the diffuse color for self-illumination, and displays a spinner to control the self-illumination amount. Default=off.
Click the map button to assign a Self-Illumination map. This button is a shortcut: You can also assign a Self-Illumination map on the Maps rollout.
Color swatch
When Color is on, the color swatch shows the self-illumination color. To change the color, click the swatch and then use the Color Selector. Adjusting the Value (in the color's HSV description) adjusts the amount of self-illumination. The greater the Value, the more the self-illumination color dominates both the ambient and diffuse color components.
Mono spinner
When Color is off, the diffuse component is used as the self-illumination color, and this spinner lets you adjust the amount of self-illumination. At 0, there is no self-illumination. At 100, the diffuse color takes over from the ambient color.
Opacity
Opacity controls whether a material is opaque, transparent, or translucent. (A more physically accurate way to generate translucency is to use the Translucent shader.)
Controlling opacity using the Opacity setting (left) or an opacity map (right).
Procedures
To reduce a material's opacity:- Change Opacity to a value less than 100%.
To preview transparency in the sample slots, view the sample object against a background. Click the checkered Background button to the right of the sample slots.
Transparent materials render more realistically when you turn on 2-Sided in the material's Shader Basic Parameters.
Interface
Opacity
Sets the opacity/transparency of the material as a percentage. The effect is best previewed against a pattern background in the sample slot. You can control opacity falloff in the Extended Parameters.
Click the map button to assign an Opacity map. This button is a shortcut: You can also assign an Opacity map on the Maps rollout.
Diffuse Level
Diffuse Level controls the brightness of the material's diffuse component.
Adjusting diffuse level
Note: The Blinn, Metal, Phong, and Strauss shaders do not have Diffuse Level control.
Procedures
To adjust the diffuse level:- Change the value of Diffuse Level.
Interface
Diffuse Level
Increasing this value increases diffuse brightness, and decreasing it reduces diffuse brightness without affecting the specular highlight. You can increase the diffuse level over and above the diffuse color's Value (in its HSV description). This parameter can range from 0 to 400. Default=100.
Click the map button to assign a Diffuse Level map. This button is a shortcut: You can also assign a Diffuse Level map on the Maps rollout.
Roughness
Roughness controls the rate at which the diffuse component blends into the ambient component.Note: The Roughness parameter is available only with the Oren-Nayar-Blinn and Multi-Level shaders, and with the Arch & Design material (mental ray).

Increasing the blending area between ambient and diffuse with Roughness
Procedures
To adjust the roughness:- Change the value of Roughness.
Interface
Roughness
As you increase this value, the matte appearance of the material increases. It also grows darker and appears more flat. At 0, the roughness is the same as it is with Blinn shading. Range (Oren-Nayar-Blinn and Multi-Layer)=0 to 100. Range (Arch & Design material)=0.0 to 1.0. Default=0.
Click the button to assign a Diffuse Roughness map. This button is a shortcut: You can also assign a Diffuse Roughness map on the Maps rollout.
Translucency Setting
The translucency controls are available for the Translucent shader.Warning: Do not use shadow maps with the translucent shader. Shadow maps result in artifacts at the edge of translucent objects.
Procedures
To make a material translucent:- Increase the HSV Value (V) of the Translucent Color.
Translucent materials render more realistically when you turn on 2-Sided in the material's Shader Basic Parameters. The translucent effect does not appear in shaded viewports.


The projection screen uses translucency
Interface

Translucent Clr (Color)
Specifies a translucency color. This is the color of light that is scattered within the material. It does not need to be the same as the filter color, which is light transmitted by the material. The two color values are multiplied. Click the color swatch to change the Translucent Color.
Click the button to assign a map to the Translucent Color component. This button is a shortcut: You can also assign a Translucent Color map on the Maps rollout.
Filter Color
Specifies a filter color that is multiplied by the translucent color. The filter, or transmissive color, is the color transmitted through transparent or semi-transparent materials such as glass. Click the color swatch to change the filter color.
Click the map button to assign a Filter Color map. This button is a shortcut: You can also assign a Filter Color map on the Maps rollout.
You can use the filter color with volumetric lighting to create effects such as colored light through a stained-glass window. Ray-traced shadows cast by transparent objects are tinted with the filter color.
Opacity
Sets the opacity/transparency of the material as a percentage. The effect is best previewed against a pattern background in the sample slot.
Click the map button to assign an Opacity map. This button is a shortcut: You can also assign an Opacity map on the Maps rollout.
Next >> 4.Specular Highlight Controls
No comments:
Post a Comment