14) How to Explode (break) compound Object into its Subobjects
Tool: 
Explode Tool (Home\Modify Panel)
Command: EXPLODE


If you want to modify sub objects of any compound object, than this command break compound object into individual primitive objects like line, arc, circle etc.
Compound object is the object that is created using primitive objects, for example, Rectangle object is created using line objects. We can explode Rectangle into individual lines and then rejoin using PEDIT command (Discussed later).
Compound object may be any shape created using compound operations like union, subtraction and intersection. Compound operations are discussed later.
Note: Use “XPLODE” command instead of EXPLODE command to change sub object properties at the same time when exploding.

![clip_image004[1] clip_image004[1]](https://blogger.googleusercontent.com/img/b/R29vZ2xl/AVvXsEgYRhfTsKmrC52fzJBf-ZaZhM4Opj0P9h5i2J4OOzmdYPyTnSWVBvRZ192NBSU0gp2-DFqDY3wSgcFPPABru3JfCm2jtPAWMFyFI6TpDLepRPAXK2uqcVL6Mq7yWXlooBb5WPA02ASu6pGv/?imgmax=800)

Make sure that line weight display setting is ON. To confirm go to “HomeRibbon\Properties\Lineweight Settings”. These settings are discussed separately.
15) How to Find the LENGTH of any Object and Change when required
Tool: 
Lengthen Tool (Home\Modify Panel)
Command: LENGTHEN


This command change the object’s length and included angle (for arc segment) according to given percentage, increment or as a final length or angle. This command is useful in the situation where you need a specified length object.
Command prompt options:
1) Select an object: Use any selection method to select an object. After selection this option displays the length and included angle (for arc segment) of selected object. To change the object’s length or included angle first select any one method to set the object’s required length and then select the object to modify.
Note: Select object by picking a nearest point on object from where object needs to change the length.
2) Delta: Specify only the increment or decrement value. If the specified value is positive then object length is increased otherwise in case of negative value object length is decreased. In case of arc segment you can specify increment or decrement of included angle.

![clip_image012[1] clip_image012[1]](https://blogger.googleusercontent.com/img/b/R29vZ2xl/AVvXsEgaVLKtEZhJMrs8ASEuM_JmFDU2OPj5dSA-H0O8ueu80AeJ2ciq_qHlRsCFQi1T78n6VN26ceDsWNFIxPhWJyJ5OHLRBrEiuT0p1Z004bZFHz3lG0orKcqpgl-l2SdpmSjn1538SpQBu_Um/?imgmax=800)


3) Percent: Specify increment or decrement value in percentage of its total length. Percentage above 100% increases the object’s length and below 100% decreases the object’s length.

![clip_image012[2] clip_image012[2]](https://blogger.googleusercontent.com/img/b/R29vZ2xl/AVvXsEigFKu-hMsEdNlebXUo16huQemYqck5rzsZxdFwVsthV2w9V6FLAGSz5_VDI1eKcYhNKLgWcnjBaanywVUOH-jY1Ke0ZhP6fkInzhj9BvBA3legz06aHMXZtWbYdVoddJp_j2RQThLaegnY/?imgmax=800)
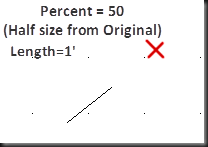
4) Total: Specify the exact length required for any object. In case of arc segment you can specify total included angle. See first example.
5) Dynamic: This is the dynamic method to change object’s length by picking and dragging a point from nearest of any End points. This will help to change the object’s length on its natural path by viewing on the screen directly.

![clip_image012[3] clip_image012[3]](https://blogger.googleusercontent.com/img/b/R29vZ2xl/AVvXsEjmOCpLFDlFtbQCBbLLtIQNFuiuSgWWf0ZPyE1RYu4JCvFlXVN0dfiOkdaXU9jfECCtLAgYbAsBxVoOUDyGYv2abTSiHR7U7hXMNoVPv6ldG6eIfxfbgFwimaT3KmUzacaDKB8fBGj1-lP7/?imgmax=800)

16) How to Align one Object with reference to another Object
Tool: 
Align Tool (Home\Modify Panel)
Command: ALIGN
This command is used to align one object with reference to another object by moving, rotating and scaling. Either one, two or three pairs of source points and definition points can be specified to align.

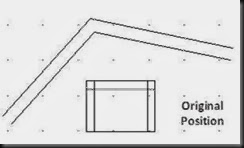


Command prompt options:
1) Select objects: Select the objects needs to align and press ENTER to finish selection.
2) Specify first source point: Pick a point on source object from where source object align with destination object.
3) Specify first destination point: Pick a point on destination object on which source object’s first source point rests. Press ENTER key to finish align if you want to align using one pair of points.
4) Specify second source point: Pick a second point on source object from where source object align with destination object.
5) Specify second destination point: Pick a second point on destination object on which source object’s second source point rests.
6) Continue: Press ENTER key to finish align using two pairs of points.
7) Scale objects based on alignment points (Yes/No): This option gives the facility to scale source object according to first and second destination points. Object is scaled exactly to match second source point with second destination point.


8) Specify third source point: This is the method to align 3D objects (Not covered in this book).
17) How to Delete a part of Object and Divide into two separate parts
Tool: 
Break Tool (Home\Modify Panel)
Command: BREAK


This command breaks the selected object between two points. Using this command you can create a gap within object. For example, creating a space (gap) for doors and windows in a room wall created using line, pline or rectangle. If the specified break points are outside the object, they are automatically projected onto the object. Close objects are break counterclockwise from first break point to second break point.
Command prompt options:
1) Select object: select an object to break using any selection technique. If you select an object using picking a point on object, this point is assumed to be the first break point.
2) First point: Use this option if you want to specify new first break point instead of previous selection point.
3) Specify second break point: Specify a second break point to break the object. A part of object between first break point and second break point is deleted.
18) How to Divide a single Object in two Objects without creating gap
Tool: 
Break at point Tool (Home\Modify Panel)
Command: BREAK


Break command is used to delete a part of object and divide a single object into two and create a gap between them. But, if first break point and second break point are on the same point then object is divided into two objects without creating gaps. You can do this by entering @ (Relative coordinates) to specify the second point. Closed objects like circles cannot be broken at a single point.
19) How to Join two Objects into a single Object
Tool: 
Join Tool (Home\Modify Panel)
Command: JOIN


This is the opposite command of “Break at Point” command to join two similar objects to create a single unbroken object.
Command prompt options:
1) Select source object: Select first object from two objects to join together.
2) Depending on the selected object type second object selection may be one of the following with the restrictions on each type-
a. Line: The line object must be collinear but can have gaps between them. Collinear means lying on the same infinite line.
b. Polyline: The object cannot have gaps between them.
c. Arc: The arc objects must lie on the same imaginary circle, but can have gaps between them. The close option converts the source arc into a circle. When joining two or more arcs, the arcs are joined counterclockwise beginning from the source object.
d. Elliptical Arc: The elliptical arcs must lie on the same ellipse, but can have gaps between them. The close option closes the source elliptical arc into a complete ellipse. When joining two or more elliptical arc, elliptical arcs are joined counterclockwise beginning from the source object.
e. Spline: The spline and other objects must be contiguous. Contiguous means lying end-to-end.
f. Helix: The helix objects must be contiguous. The resulting object is a single spline.
20) How to Reverse the Direction of any Object
Tool: 
Reverse Tool (Home\Modify Panel)
Command: REVERSE

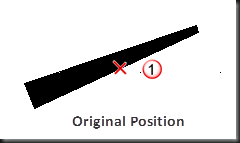

Reverse the direction of selected lines, polylines, splines and helixes. This method is useful for different width polylines and lines with text line types.
Command prompt options:
1) Select line, Polyline, Spline or helix to reverse direction: Select any object to change direction. This prompt repeated until you press ENTER to finish the command.
21) How to Edit Polyline Object
Tool: 
Edit Polyline Tool (Home\Modify Panel)
Command: PEDIT


This is one of the most important command used in AutoCAD. In general, using this command you can convert line and arc objects into polylines, converting polylines into curves and join multiple polyline objects into one polyline object.
Command prompt options:
1) Multiple: Type ‘M’ to allow selection of multiple objects on which modification is required. This option is generally used to convert multiple line objects into polyline and if you want to join multiple polyline segments into one segment.
2) Select Polyline: Use this option to select one object that needs to modify.
If the selected object is a line, arc or a spline then following prompt is displayed-

Type ‘Y’ to convert all objects into polylines. If the selected object is spline then following command prompt option is displayed-

Enter precision value in between 0 and 99 to determine how accurately the resulting polyline is to fit to the source spline.
Following edit operations can be performed on polyline -
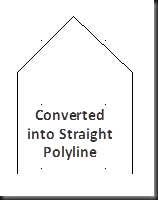
1) Close: Close the polyline object by creating a closing segment from one End point to another End point. See first example.
2) Open: This option removes the closing segment of the polyline.

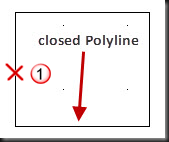

3) Join: Use this option to join two or more open polyline objects into one object. Use join type option if there is a distance between objects End points or you can use Fuzz distance.


Command prompt options:
a) Enter Fuzz distance: This option is used when two joining points have a gap. Enter Fuzz distance to set to a value covers the distance between End points needs to be join. Both End points are join together using specified Jointype method. See example in Following option.
b) Jointype: This option is also used when two joining points are not on the same coordinate. Use this option to specify the method of joining:
i. Extend: This option extend or trim selected objects to join their End points.


ii. Add: This option add a straight segment between nearest endpoints.


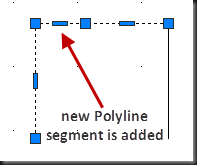

iii. Both: This option determines the best possible method from Extend and Add.
4) Width: Change the width of polyline object. This option is also available when creating a polyline. You can use this option to change the starting and ending width of a segment.


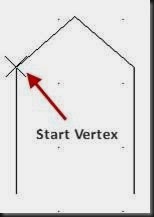
5) Edit Vertex: This option is available only when single polyline object is selected. Using this option you can manipulate polyline object vertices by performing many vertex operations like moving, inserting, deleting vertices. This option marks the current vertex by placing large X on it. Following are the operations you can perform on vertex-


a. Next: Move current vertex mark to the next available vertex up to the next vertex.
b. Previous: Move current vertex mark to the previous available vertex up to the start vertex.
c. Break: Use this option to delete segments from two specified vertices. This option first save the current vertex mark location and then provide Next/Previous options to move the vertex marker.


![clip_image080[1] clip_image080[1]](https://blogger.googleusercontent.com/img/b/R29vZ2xl/AVvXsEgIhIl3VTuMMCOE69ufrelxqh38ZdmURxPYqmu1i_AeEuYuD3h6GqZIVmQsSIt2Q78kowrSfmxtxmLZZeUh2RlDU0UjRJ0-1claQz2i2Tfa-HKebWXjL2hwIHzULiN2gICqxQhdfxdjjcfz/?imgmax=800)
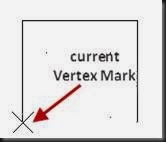


i. Next: Move current vertex mark to next vertex mark.
ii. Previous: Move current vertex mark to previous mark.
iii. Go: Delete the segments between first saved positions to current vertex mark position.
iv. Exit: Exits from break option and return to parent options.
d. Insert: This option adds a new vertex to the polyline after current vertex mark.


![clip_image084[1] clip_image084[1]](https://blogger.googleusercontent.com/img/b/R29vZ2xl/AVvXsEgFBJx6XipHMr36kIKDxDOJBpp27Nku41gYNg1tBtnNCzhCD8fF1RK4AAPRjI00ZjmYfsGPZgeCBYVmRZp8oq2MNnrBTkyD0kWavA2ks9SWC-IAI929c6JLbkRlOUCweFd8d7va0AIZcdXz/?imgmax=800)

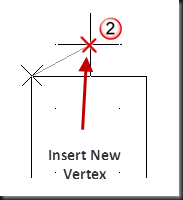

e. Move: This option moves the marked vertex to a new location. There is a direct method to perform this task by selecting the polyline object and manipulating vertices by dragging it.


f. Regen: Regenerate the polyline to display pending changes.
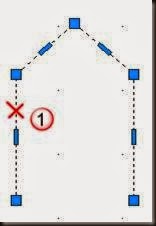
g. Straighten: Make one straight polyline segments from multiple segments between two specified mark positions. Saves the current mark position and allow moving on other vertices.




i. Next: Move current vertex mark to next vertex mark.
ii. Previous: Move current vertex mark to previous mark.
iii. Go: Deletes all segments between saved mark position and current vertex mark position and replace them by using a single straight polyline segment.
iv. Exit: Exits from break option and return to parent options.
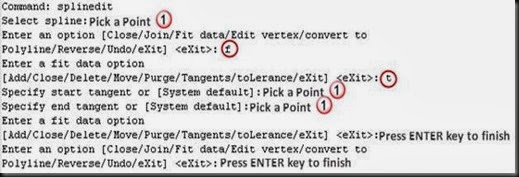
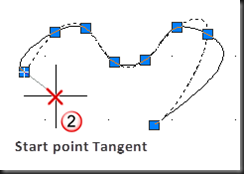
h. Tangent: This option adds a new Tangent direction to the marked vertex. This tangent is useful in curve fitting. See example in Fit option.
i. Width: Change the width of polyline segment from current vertex mark to the next vertex. You must regenerate the polyline to display the new width.



j. Exit: Exit from edit vertex and go to parent options.
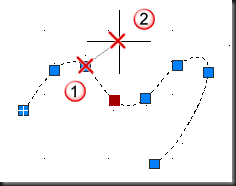
6) Fit: Convert straight polyline segment into Arc segment (Arc-fit polyline). The curve passes through all vertices of the polyline.
a) Using Default Tangent:


b) After Specifying Tangent for any Vertex:

![clip_image107[1] clip_image107[1]](https://blogger.googleusercontent.com/img/b/R29vZ2xl/AVvXsEgmN935KF8mFrRC2BMCbv83eaXSSVMl51mgu7HVUZfgcYnKpu2FVViT8i00p4lgc-W8r8yL8GtsUdA9FPzNY4fwRb5-bNSXY9lzwjq4OaouKRCdlWfatuaUuPePgl3XFte1ha5RpShhaBjP/?imgmax=800)


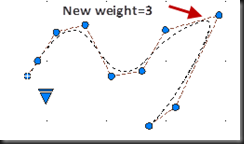
7) Spline: Convert a polyline into Spline. Spline is the smooth polyline. In this option all vertices of the polyline are converted into control points (CV) or frame. Spline curves passes through the first and last control points if the original polyline was not closed. This curve is called a Spline-fit polyline. For more information see “How to create Smooth polyline” topic.

![clip_image107[2] clip_image107[2]](https://blogger.googleusercontent.com/img/b/R29vZ2xl/AVvXsEjYDfZuZiPlPV_XAdAbMt3CHHDyd-i6hQxAZgNM5u7zBLQP9DIvrvN6_wSoHR3gp5vXXJI9jOyvo5gTVrEmEth4NruN59Gji_aovvb2rCv266CMI97Zjw1LyR7DnNGj9sUreRY7Cym-9Jzj/?imgmax=800)


8) Decurve: This option removes the conversion of straight polyline segments into Fit (Arc-fit polyline) or spline. This is the opposite of Fit and Spline option and straightens all segments of polyline. You cannot use this option after using break or trim command on polyline to convert back into straight segments.


9) Ltype Gen: When the dash line type is applied on the selected polyline, this option controls the dash position according to vertices. When this option is set to OFF line type starting and ending with a dash at each vertex.


10) Reverse: Reverse the direction of selected lines, polylines, splines and helixes. This method is useful for different width polylines and lines with text line types. For more information see separate “REVERSE” command.
11) Undo: Remove the effect of previous PEDIT options one by one.









![clip_image004[1] clip_image004[1]](https://blogger.googleusercontent.com/img/b/R29vZ2xl/AVvXsEgYRhfTsKmrC52fzJBf-ZaZhM4Opj0P9h5i2J4OOzmdYPyTnSWVBvRZ192NBSU0gp2-DFqDY3wSgcFPPABru3JfCm2jtPAWMFyFI6TpDLepRPAXK2uqcVL6Mq7yWXlooBb5WPA02ASu6pGv/?imgmax=800)


![clip_image012[1] clip_image012[1]](https://blogger.googleusercontent.com/img/b/R29vZ2xl/AVvXsEgaVLKtEZhJMrs8ASEuM_JmFDU2OPj5dSA-H0O8ueu80AeJ2ciq_qHlRsCFQi1T78n6VN26ceDsWNFIxPhWJyJ5OHLRBrEiuT0p1Z004bZFHz3lG0orKcqpgl-l2SdpmSjn1538SpQBu_Um/?imgmax=800)


![clip_image012[2] clip_image012[2]](https://blogger.googleusercontent.com/img/b/R29vZ2xl/AVvXsEigFKu-hMsEdNlebXUo16huQemYqck5rzsZxdFwVsthV2w9V6FLAGSz5_VDI1eKcYhNKLgWcnjBaanywVUOH-jY1Ke0ZhP6fkInzhj9BvBA3legz06aHMXZtWbYdVoddJp_j2RQThLaegnY/?imgmax=800)


![clip_image012[3] clip_image012[3]](https://blogger.googleusercontent.com/img/b/R29vZ2xl/AVvXsEjmOCpLFDlFtbQCBbLLtIQNFuiuSgWWf0ZPyE1RYu4JCvFlXVN0dfiOkdaXU9jfECCtLAgYbAsBxVoOUDyGYv2abTSiHR7U7hXMNoVPv6ldG6eIfxfbgFwimaT3KmUzacaDKB8fBGj1-lP7/?imgmax=800)


![clip_image080[1] clip_image080[1]](https://blogger.googleusercontent.com/img/b/R29vZ2xl/AVvXsEgIhIl3VTuMMCOE69ufrelxqh38ZdmURxPYqmu1i_AeEuYuD3h6GqZIVmQsSIt2Q78kowrSfmxtxmLZZeUh2RlDU0UjRJ0-1claQz2i2Tfa-HKebWXjL2hwIHzULiN2gICqxQhdfxdjjcfz/?imgmax=800)


![clip_image084[1] clip_image084[1]](https://blogger.googleusercontent.com/img/b/R29vZ2xl/AVvXsEgFBJx6XipHMr36kIKDxDOJBpp27Nku41gYNg1tBtnNCzhCD8fF1RK4AAPRjI00ZjmYfsGPZgeCBYVmRZp8oq2MNnrBTkyD0kWavA2ks9SWC-IAI929c6JLbkRlOUCweFd8d7va0AIZcdXz/?imgmax=800)


![clip_image107[1] clip_image107[1]](https://blogger.googleusercontent.com/img/b/R29vZ2xl/AVvXsEgmN935KF8mFrRC2BMCbv83eaXSSVMl51mgu7HVUZfgcYnKpu2FVViT8i00p4lgc-W8r8yL8GtsUdA9FPzNY4fwRb5-bNSXY9lzwjq4OaouKRCdlWfatuaUuPePgl3XFte1ha5RpShhaBjP/?imgmax=800)


![clip_image107[2] clip_image107[2]](https://blogger.googleusercontent.com/img/b/R29vZ2xl/AVvXsEjYDfZuZiPlPV_XAdAbMt3CHHDyd-i6hQxAZgNM5u7zBLQP9DIvrvN6_wSoHR3gp5vXXJI9jOyvo5gTVrEmEth4NruN59Gji_aovvb2rCv266CMI97Zjw1LyR7DnNGj9sUreRY7Cym-9Jzj/?imgmax=800)


