11) How to Chamfer (Bevel) the edges of Objects
Tool:Command: CHAMFER


This is one of the most important operations required to perform on 2D and 3D objects. This command bevels the edges of objects according to specified distances and angles. The distances and angles that you specify are applied in the order of object selection. You can chamfer lines, polylines, rays and xlines.
Command prompt options:
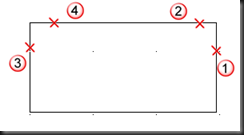
1) Select First line: Specify the first of two edges required to create a 2D chamfer. If you want to override the previous chamfer distance with ‘0’ then select object while holding down SHIFT key (SHIFT+click). If the selected objects are line segments of a 2D polyline, they must be adjacent or separated by no more than one segment. If they are separated by another polyline segment, CHAMFER command deletes the segment that separates them and replaces it with the chamfer line.
2) UNDO: Remove the effect of previous Chamfer actions.
3) Polyline: Use this option to Chamfer an entire 2D polyline instead of one junction (corner). The intersecting polyline segments are chamfered at each vertex of the polyline. Chamfer line become new segments of the polyline. If the polyline include segments that are too short for chamfer distance then, those segments are not chamfered.


4) Distance: Use this option to sets the two chamfer distances for two line segments on to which chamfer is applied. If you set both distances to zero, CHAMFER command extends or trim the two lines so they end at the same point. The value you entered becomes the current distances for subsequent CHAMFER commands. Changing this value does not affect existing chamfered objects.


5) Angle: Use this option to specify chamfer distance for first line and an angle for second line.


6) Trim: Use this option to set trim mode to 0 or 1. Set this option to 1 to trim the edges to create a chamfer line segment. Otherwise, when this option is set to 0 then chamfer line segment is created without trimming the chamfered edges.


7) Method: Use this option to set the default method. Use this option to switch between chamfer methods from distance method or distance-angle method.
8) Multiple: Use this option to apply chamfer on multiple set of objects. This option repeat chamfer command until you presses ENTER key to finish the command.

12) How to Fillet (Rounded Corners) the edges of Objects
Tool:Command: FILLET


This is the one of the most important operation required to perform on 2D and 3D objects. This command rounds and fillets the edges of objects. FILLET and CHAMFER are similar commands with a difference that CHAMFER creates a line segment and FILLET creates an arc segment according to specified radius.
You can fillet arcs, circles, ellipses, elliptical arcs, lines, polylines, rays, splines and xlines.
Command prompt options:
1) Select first object: Specify the first of two objects required to create fillet. If you want to override the previous fillet distance with ‘0’ then select object while holding down SHIFT key (SHIFT+click).
If the selected objects are straight line segments of a 2D polyline, they can be adjacent or separated by one other segment. If they are separated by another polyline segment, FILLET command deletes the segment that separates them and replaces it with the fillet.
More than one fillet can exist between arcs and circles, so select the object close to where you want the End points to create the fillet.
2) UNDO: Remove previous actions of fillet options.
3) Polyline: Use this option to fillet an entire 2D polyline instead of one junction (corner). The intersecting polyline segments are filleted at each vertex of the polyline.

![clip_image007[1] clip_image007[1]](https://blogger.googleusercontent.com/img/b/R29vZ2xl/AVvXsEgqPmkCKwvOW_nFFa5uFuy0cN3xhEhb93VcIHXquYdcSzpk6Ddm_DOwpIpd6petUyWBAr2fS2k9h2uYtp9nKQeCZawa82UaQEJ7AAobwcoYScm8Y5XQmmgk5K8pu7ydBKSnaa6mcUC4UdT9/?imgmax=800)

If one arc segment separates two line segments that converge (meeting/junction/merging/coming together) as they approach the arc segment, FILLET command removes the arc segment and replaces it with a fillet arc.
4) Radius: Use this option to set the radius of a arc to create the fillet. If you set radius to zero, fillet extends or trims the two objects to create a sharp corner.
![clip_image007[2] clip_image007[2]](https://blogger.googleusercontent.com/img/b/R29vZ2xl/AVvXsEgi8zyns2iSMU5JyvzYqxCP5yzCJQfAxzpxNhDe19XQgVkjuZzPJ30_dwwMRwNserk-rrdO1BXmjMdWiTDHBhCGlMukjAX8ehU30bC-FbZAwPZHG9-LHH9BuTev6b6UhsnYWtxjWhmpCRkb/?imgmax=800)

The value you enter becomes the current radius for subsequent FILLET commands. Changing this value does not affect existing fillet arcs.
5) Trim: Use this option to set trim mode to 0 or 1. Set this option to 1 to trim the filleted edges to insert fillet arc. Otherwise, when this option is set to 0 then fillet arc segment is created without trimming the filleted edges.

![clip_image007[3] clip_image007[3]](https://blogger.googleusercontent.com/img/b/R29vZ2xl/AVvXsEiShBUlgG_Tcv-ZCkuuiFcqQxO7IHAw-AZj97A6yov9vraPrvtpKieyA_Dmh4C5vdGSeAzXrbM5GtDSywh8dCpcesGVUI2bwVLaJRONDpiHkFfKOgxcW5pepVDsCIsHLoAwj438leMiEGKl/?imgmax=800)

6) Multiple: Use this option to apply fillet on multiple set of objects. This option repeat fillet command until you presses ENTER key to finish the command.
![clip_image023[1] clip_image023[1]](https://blogger.googleusercontent.com/img/b/R29vZ2xl/AVvXsEh1h63bg4-YhHLCs952we7y7_9TSAJ-jdphYqfxuOpadixOtLGKhtamSR3_fNwnZD8eJAjhEOdmSuqAUvZCk02-gyzNyOBy39wFW_SOq4o6_9_lfgcCkZnBDADQm23sbALm9ml_kof3hWF0/?imgmax=800)

13) How to Create ARRAY of Objects
Tool:Command: ARRAY
Array is a group of objects with equal distance to each other arranged in a specified pattern. Using array we can create multiple copies of objects. In AutoCAD, you can arrange objects in rectangular or polar array.
Rectangular Array:
Rectangular array display a following dialog box.In rectangular array object’s copies are arranged in rows and columns.
Dialog Box options:

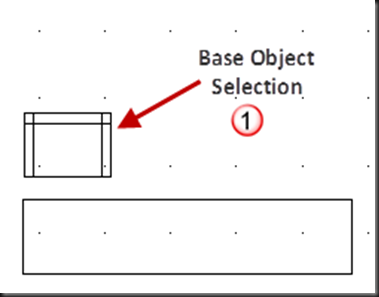

1) Select Objects: Select the objects used to create the Array. This button temporarily hides the dialog box to select the objects. Press ENTER key to finish object selection. It is also possible to select object before running Array command.
2) Rows: Specify the number of rows in the Array. If you specify one row, you must specify more than one column. By default, the maximum number of array elements that you can generate in one command is 1,00,000 (1 Lac). the limit can be changed by changing environment variable using (setenv “MaxArray” “3,00,000”) at the command prompt.
3) Columns: Specifies the number of columns in the array. If you specify one column, you must specify more than one row.
4) Offset Distance and Direction: Offset distance is the space between each array element and the direction is the angular deflection.
a. Row offset and Pick a Row Offset: Row offset is the vertical distance between each row. Distance is measured in current unit. You can type the offset distance in current unit or pick distance visually using “Pick Row Offset” button
b. Column offset and Pick column offset: Column offset is the horizontal distance between each column. Distance is measured in current unit. You can type the offset distance in current unit or pick distance visually using “Pick column offset” button
c. Angle of Array and Pick angle of Array: Specify the angle to rotate the array. In general, rotation angle is ‘0’. You can type the angle (Positive for counterclockwise and Negative for clockwise) or pick rotation angle visually using “Pick Angle of Array” button
Polar Array:
Polar array display a following dialog box.In polar array object’s copies are arranged in circular pattern around a specified center point.
Dialog Box options:


1) Select Object
2) Center point and Pick center point
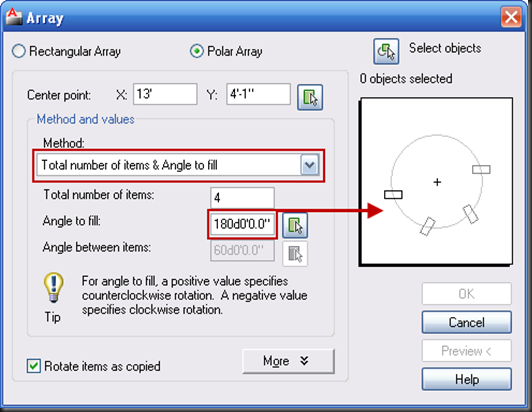
3) Method: Provides three different methods to position objects.
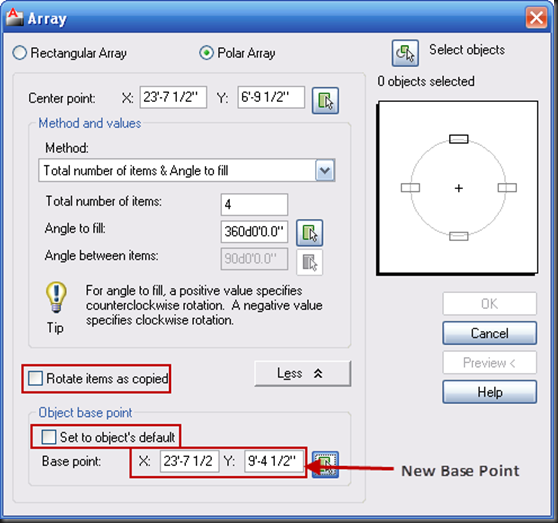
a. Total Number of items and angle to fill: In this method specify number of copies required and angle up to which items are copied. The default angle is 360 degree that means complete circular array is required.

b. Total Number of items and angle between items: In this method specify number of copies required and angle between base point of arrayed object and center point of the circle. You can enter only positive value for the angle.


c. Angle to fill and angle between items: In this method both angles will decide the number of copies possible in the array.

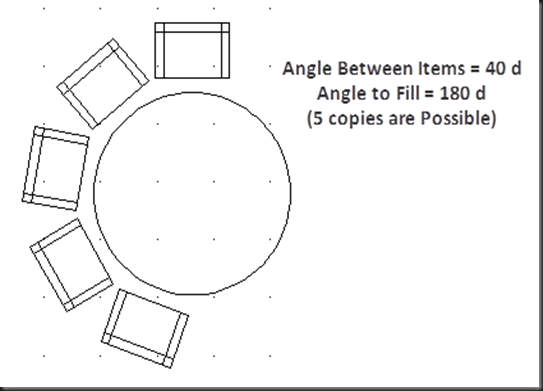
4) Rotate items as copied: This option rotates the object when create a copy to maintain the object face in relation with the center point of the circle. When this option is disabling, Items remain in its original state. Due to object’s default base point copies may not positioned correctly. This problem can be solved using next option.

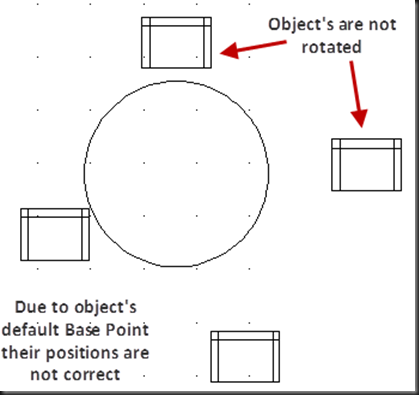
5) Object base point: This is the option available in MORE button. Using this option we can change the base point of object used in array. This base point will remain at a constant distance from the center point of the array when array is created. You can ON/OFF the checkbox available to use the default base point or this new base point.

6) Preview: You can view the arrangement preview in a dialog box and if you want to preview with actual objects, click the preview button. Press ‘ESC’ button to return to Dialog Box.


No comments:
Post a Comment