1) What is Drawing?
People use a tool like a pencil, crayon or chalk to draw a picture, an image or what they want. Drawing is the act of making a design or image. Drawing can be made for artistic or technical (Engineering) purpose. An artistic drawing can be made as a preliminary step for finished artwork or as information for future use and can be converted into technical drawing.2) What is Engineering Drawing?
A drawing with measurement is called Engineering Drawing. Engineering drawing is also known as technical drawing or drafting and the person who does this is called draughtsman.A general drawing shows how an object should look, but an engineering drawing show how an object should look, how it will be put together and how it looks from different angles with actual measurements. Measurement specifications (called dimensions) make the difference between drawing and engineering drawing. Engineering drawing is the creation of standardized technical drawings made by architects, interior designers, drafters etc.
A drawing hold many purposes and meanings while a technical drawing is intended to interpreted in only one way. Standards and conventions for layout, line thickness, text size, symbols, view projections, descriptive geometry, dimensioning and notations are used to create an engineering drawing.
There are two types of engineering drawings based on graphical projection. Projection is the method used to create an image of a 3-D object onto a 2-D surface. These are:
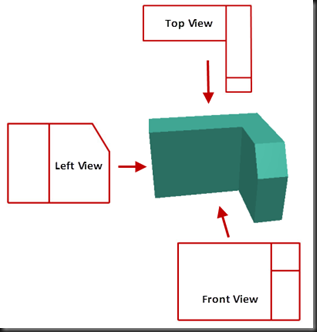
1) Two-Dimensional (2-D) Representation: Orthographic (also called Orthogonal) projection is used to create 2-D view of any object. In this view only two of the three dimensions of the object are seen. In this representation 6 different views are possible and these views are also known as Multiview Orthographic Projections.
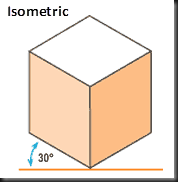
2) Three-Dimensional (3-D) Representation: This representation is also known as perspective view (pictorial drawing) of an object in which all three dimensions of an object are visible. Isometric and Oblique projections are used to represent 3-D objects on 2-D surface. This topic is not covered in this book.


3) Different Views to represent 3-D object on 2-D Surface
1) Multiview Orthographic Projections: 2-D view of an 3-D object can be created using orthographic projection. This projection creates up to six views of an object with each projection plane (like a 6-side box) parallel to one of the coordinate axis of the object. The views are positioned relative to each other according to first-angle or third-angle projection. From 6 different sides, there is 3-sides of a drawing can give enough information to make a 3-D object. These views are Front, Top and Left side view. The other three views are opposite side views and these are Back, Bottom and Right side view.

2) Section Views: A section or cross-section is a view of a 3-D object from the position of a cut plane through the object. A floor plan is a section viewed from the top. In such views, the portion of the object in front of the plane is omitted to reveal what lies beyond. In the case of a floor plan, the roof and upper portion of the walls may be omitted. Elevations or roof plans are orthographic projections, but they are not sections as their viewing plane is outside of the object.
A cross-section is a common method of showing the internal arrangement of a 3-D object in 2-D. Section view is generally used in engineering drawing and presented as cross-hatched. The style of crosshatching indicates the type of material the section passes through as described later in this chapter. In this view the building construction can be cut into two parts by a cross-sectional cutting line. The broken two parts of a building will show you the dimensions like area, height, width and the parts to be arranged in all the locations of a building.

3) Elevation: An elevation is a view of a 3-D object from the position of a horizontal plane beside an object. In other words, an elevation is a side-view as viewed from the Front, Back, Left or Right.
An elevation is a common method of showing the external configuration and detailing of a 3-D object in two dimensions. Building faces are shown as elevations in architectural drawings and engineering drawings.
Elevations are the most common orthographic projection for representing the appearance of a building from exterior because elevation specify the composition of the different faces of the building (also used in furniture) including ridge heights, the positioning of the doors, windows and ventilations, exterior finishes and other architectural details.

4) Plan View: This is top view from the multiview orthographic projection. A plan view is the section view from the top. In this view, the portion of the object above the plane is omitted to reveal what lies beyond. In the case of a floor plan, the roof and upper portion of the walls may be omitted.
Plan view is the most popular view to represent a building floor plan on 2-D surface.

5) Auxiliary View: An auxiliary view is a view taken from an angle that is not one of the primary views. An auxiliary view is a view at an angle used to give deeper insight into the actual shape of thee object.
4) Units of Measure
Measurement units are used to measure definite magnitude of a physical quantity. In engineering drawing for architectural purpose we need to measure length, area and angle. Following are the tables of units with their standard values and conversion.1) Units of Length Measurement:

2) Units of Area Measurement:


3) Units of Angle Measurement:
| Units | Formula |
| degree angular (° or deg) | quadrant/90 |
| gon or grade (g or grd) | 0.9*degree_angular |
| minute (' or m) | 1/60*degree_angular |
| quadrant (quad) | 3.14159265/2 |
| revolution (r ) | 360*degree_angular |
| second (" or s or sec) | 1/60*minute_angular |
5) Dimensioning
The purpose of dimensioning is to provide a clear and complete description of an object. A complete set of dimensions will permit only one interpretation need to construct the object. Dimensioning should follow these guidelines:· Accuracy: Correct values must be given.
· Clearness: Dimensions must be placed in appropriate positions.
· Completeness: Nothing must be left out and nothing duplicated.
· Readability: The appropriate line quality must be used for legibility.
There are two types of dimension representation:
1) Dimension Line: The dimension line is a thin line, broken in the middle to allow the placement of the dimension value, with arrowheads at each end. An arrowhead length is approximately 3 times of line width. An extension line extends a line on the object to the dimension line.
2) Leader: A leader is a thin line used to connect a dimension with a particular area. A leader may also be used to indicate a note or comment about a specific area.
6) Drafting Standards and Drawing Symbols
7) Coordinate System
A coordinate system allows one to place points on a plane in a precise way. Coordinate system uses a set of number called coordinates and they uniquely determine the position of a point on a plane.The most useful coordinate system is called Rectangular Coordinate System (also known as Cartesian coordinate system) and Polar Coordinate System.
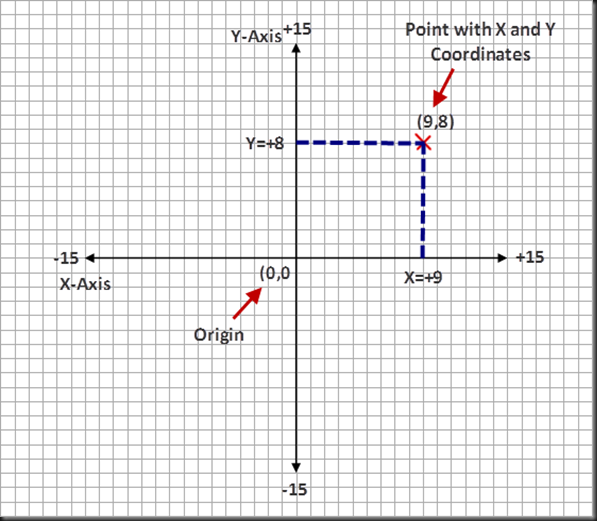
1) Cartesian Coordinate System: In this coordinate system, two lines, which are perpendicular to each other, are used and called axes. One line is horizontal and one is vertical. Their intersection is called the Origin. The horizontal axis is called the x-axis, and the vertical axis is called the y-axis.
Each axis is the numbered line marked with numbers in regular intervals. On the X-axis, points to the right are positive and to the left are negative. For the y-axis, points above the origin is positive and below are negative. A pair of numbers, written in the form (dx,dy), represents a point in the Cartesian coordinate system where dx is the distance from X-axis and dy is the distance from y-axis. In this way, every point in the plane can be specified uniquely by a pair of numbers (x,y), and every pair of numbers represents a unique point in the plane.
Point Identification in a Plane:

Creating a Line using Two Specified End Points:

Straight Line Distance by the Pythagoras Formula:

2) Polar Coordinate System: In polar coordinate system, a point is specified by its angle to a reference line and distance from origin (pole). In this system, the plane is marked a point called pole or origin. A horizontal line is drawn from this point to the right and we call this the reference line.

A point in the plane is specified by two numbers (r, θ). The θ is the angle from the reference line (positive angle is measured in counter-clock wise direction) from the point to the origin (negative distance is the opposite side with respect to origin). Polar coordinate is very useful in representing curves that has a center.


No comments:
Post a Comment