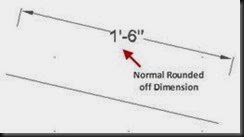
Parametric Drawing is a Technology that is used for designing with Constraints. Constraints are associations and restrictions applied to 2D Geometry. Parametric Drawing adds Constraints (Rules) to geometry to ensure that the design fulfills the specified requirements. A blue Cursor icon always displays when you move the cursor over an object that has Constraints applied to it.
In the design phase of a project, Constraints provide a way to enforce requirements. Changes made to objects can adjust other objects automatically and restrict changes to distance and angle values. There are two types of Constraints:
1. Geometric Constraint- These constraints control the relationships of objects with respect to each other.
2. Dimensional Constraint- These constraints control the distance, length, angle and radius values of objects.
Using Constraints you can
· Maintain design specification and requirement by constraining the geometry with a drawing.
· Apply multiple geometric constants to object instantly
· Include Formula and Equations within dimensional Constraints.
· Make design changes quickly by changing the value of a variable.
To get the full advantage of Parametric Constraints, First apply geometric constraints to determine the shape of a design and then apply dimensional constraints to determine the size of size of objects in a design.
 Coincident (Parametric\Geometric panel)
Command- GCCOINCIDENT
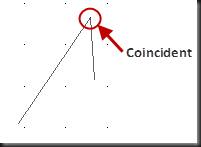
Constraints two points to coincide or a point to lie anywhere on an object or the extension of an object or the extension of an object
Following are the valid constraints objects and points
· Line
· PolyLine Segment
· Circle
· Arc
· Polyline Arc
· Ellipse
· SPLine
· Two valid constraint points
Following is the procedure to apply this constraint
· Click the constraint tool
· Select first point or object
· Select second point or object
The second selected point or object is made coincident to the first
 Collinear (Parametric\Geometric panel)
Command- GCCOLLINEAR
Using this constraint, you can make two objects to lie along the same line. Following are the valid constraint object and points
· Line
· PolyLine
· Ellipse
· MultiLine Text
Following is the procedure to apply this constraint
· Click the Constraint tool
· Select First Object
· Select Second Object
The Second selected Object is mode collinear with the first line
 Concentric (Parametric\Geometric panel)
Command: GCCONCENTRIC
Add this constraint on Circles, Arcs or Ellipse to maintain the same center Point. Following are the Valid Constraint Objects and Points
· Circle
· Arc
· PolyLine Arc
· Ellipse
Following is the procedure to apply this constraint
· Click the Constraint Tool
· Select First Object
· Select Second Object
The second selected object is made concentric with the First Object
 FIX (Parametric\Geometric panel)
Command: GCFIX
Use this Constraint to Fix Point of any object. For Example, you can Fix End Point of any Line segment to lock the End Point on that place.
When you apply the FIX Constraint to a point on an object, you lock the point in place. You can move the object around the locked point.
When you apply the Fix Constraint to an object, the object is locked and cannot be moved. Following are the valid constraints Objects and Points-
· Line
· Polyline Segment
· Circle
· Arc
· PolyLine Arc
· Ellipse
· SPLine
Following is the procedure to apply this constraint
· Click the Constraint tool
· Select point or Object
Now the selected point is locked in place and cannot be moved.
 Parallel (Parametric\Geometric panel)
Command: GCPARALLEL
Use this Constraint t parallel one object like line to another Line Object. Following are the Valid Constraint objects and Points
· Line
· Polyline Segment
· Ellipse
· MultiLine Text
Following is the procedure to apply this constraint
· Click the Constraint Tool
· Select First Object
· Select Second Object
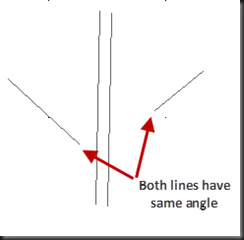
The Second selected Object is made parallel to the First.
 Perpendiculr (Parametric\Geometric panel)
Command- GCPERPENDICULAR
Use this tool to create one line object or Polyline Segment to maintain 900 Angle with another line object o Polyline segment. Following are the valid Constraint objects and Points
· Line
· Polyline Segment
· Ellipse
· MultiLine Text
Following is the procedure to apply this constraint
· Click the Constraint Tool
· Select First Object
· Select Second Object
The second selected object is made perpendicular to the First
 Horizontal (Parametric\Geometric panel)
Command – GCHORIZONTAL
Use this Constraint to make any line object or segment of line object(2 Points) parallel to X Axis. Following are the valid constraint objects and Points
· Line
· Polyline Segment
· Ellipse
· Multiline Text
· Two Valid Constraint Points
Following is the procedure to apply this constraint
· Click the Constraint tool
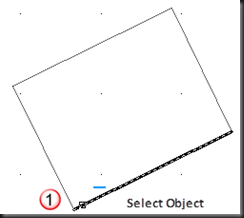
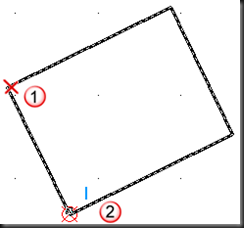
· Select any object or two valid constraint points on object
The second selected point on an object is made horizontal to the first selected point. In case of Object selection, far endpoint from selection point is made horizontal.
Method-1: Using Object

Method-2: Using 2 Points


 Vertical (Parametric\Geometric panel)
Command – GCVERTICAL
Use this Constraint to make any line object or segment of line object(2 Points) parallel to Y Axis. Following are the valid constraint objects and Points
· Line
· Polyline Segment
· Ellipse
· Multiline Text
· Two Valid Constraint Points
Following is the procedure to apply this constraint
· Click the Constraint tool
· Select any object or two valid constraint points on object
The second selected point on an object is made horizontal to the first selected point. In case of Object selection, far endpoint from selection point is made vertical.
Method-1: Using Object


Method-2: Using 2 Points
![clip_image034[1] clip_image034[1]](https://blogger.googleusercontent.com/img/b/R29vZ2xl/AVvXsEhiny9-wQnzvD029RQlabJJOL6yEpvBL5JsT-OT_B1gyiaHgl-US07kZuimmPU4r_9HoIUXVUqseAt6xQk02bdB5eMtCiYSly20S801D36LypGmn4TGPqJJTL-q1CejeOP2ZigL2X189Vzq/?imgmax=800)
 Tangent (Parametric\Geometric panel)
Command: GCTANGENT
Use this command to create one object to Tangent to another Object Line or Arc. In case of any change in one object, they must maintain tangency with each other. Following are the valid Constraints Objects and Points
· Line
· PolyLine segment
· Circle, Arc, Polyline Arc, Ellipse
· Combination of Circles, Arcs or Ellipse.
A Circle can be tangent to a line even if the circle does not touch the line. A curve can be tangent to another even if they do not physically share a point.
Following is the procedure to apply this constraint
· Click the Constraint Tool
· Select First Object
· Select Second Object
Now both objects maintain tangency to each other even they change their dimensions
 Smooth (Parametric\Geometric panel)
Command- GCSMOOTH
Using this Constraint you can match(coincident) any SPLine object’s end point smoothly and contiguous with another SPLine, Line, Arc or PolyLine
Following are the valid Constraint Objects and Points-
· Spline
· Line
· PolyLine Segment
· Arc
· PolyLine Arc
Following is the procedure to apply this constraint
· Click the Constraint Tool
· Select First Object(must be SPLine)
· Select Second Object
The Second selected object is made G2 continuous with the First SPLine.


 Symmetric (Parametric\Geometric panel)
Command: GCSYMMETRIC
Using this constraint you can make two objects symmetric with reference to the selected line called Symmetry Line.
For Lines, the Line’s Angle is made Symmetric and not the end points. For Arcs and Circles, the Center and the Radius are made Symmetric and not the end Point of the Arc.
Following are the valid Constraint Objects and Points
· Line
· PolyLine Segment
· Circles
· Arc
· PolyLine Arc
· Ellipse
Following is the procedure to apply this constraint
· Click the Constraint Tool
· Select the First Point or Object
· Select Second Point or Object
· Select Symmetric Line
The Second Point or Object is made Symmetric to First Point or Object with reference to Symmetry Line.
 Equal (Parametric\Geometric panel)
Command- GCEQUAL
Resize selected arcs and circles to the same radius or selected line to the same length. Following are the valid Constraint Object and Point
· Line
· PolyLine segment
· Circle
· Arc
· PolyLine Arc
Following is the procedure to apply this constraint
· Click the Constraint Tool
· Select First Object
· Select Second Object
The second Object is made equal to the First Object
 Auto Constraint (Parametric\Geometric panel)
Command: AUTOCONSTRAIN
Use this command to apply constraint based on specified priority depending on the type of object. The following condition are checked before multiple geometric constraint are applied-
1. Are the objects perpendicular or tangential to each other within the specified tolerances
2. Do they also intersect within the specified tolerances
By pressing ‘S’, you can open the Auto Constrain dialog Box to change priority and other properties

Controls the constraints that are applied to a selection set, and the order in which they are applied when using the AUTOCONSTRAIN command.
The following conditions are checked before multiple geometric constraints are applied:
· Are the objects perpendicular or tangential to each other within the tolerances specified in the AutoConstrain tab?
· Do they also intersect within the specified tolerances?
If the first condition is met, then tangent and perpendicular constraints are always applied if the check boxes are cleared.
Autoconstrain Headings
· Priority — Controls the order in which constraints are applied.
· Constraint Type — Controls the type of constraint applied to objects.
· Apply — Controls the constraints that are applied when applying constraints to multiple objects.
Move Up
Changes the order of the selected item by moving it up in the list.
Move Down
Changes the order of the selected item by moving it down in the list.
Select All
Selects all geometric constraint types to autoconstrain.
Clear All
Clears all geometric constraint types to autoconstrain.
Reset
Resets AutoConstrain settings to default values.
Tangent Objects Must Share an Intersection Point
Specifies that two curves must share a common point (as specified within the distance tolerance) for the tangent constraint to be applied.
Perpendicular Objects Must Share an Intersection Point
Specifies that lines must intersect or the endpoint of one line must be coincident with the other line or endpoint of the line as specified within the distance tolerance.
Tolerances
Sets the acceptable tolerance values to determine whether a constraint can be applied.
· Distance — Distance tolerance are applied to coincident, concentric, tangent, and collinear constraints.
· Angle — Angular tolerance are applied to horizontal, vertical, parallel, perpendicular, tangent, and collinear constraints.
Following is the procedure to apply this constraint
· Click the Constraint Tool
· Select the Object
 Show / Hide Geometric Constraints (Parametric\Geometric panel)
Command- CONSTRAINTBAR
Use this tool to show or hide Constraint icons from selected objects.
Following is the procedure to apply this constraint
· Click the Tool
· Select Objects
 Show all Geometric Constraints (Parametric\Geometric panel)
Command- CONSTRAINTBAR
Show Geometric icons on all objects if they are hidden.
 Hide all Geometric Constraints (Parametric\Geometric panel)
Command- CONSTRAINTBAR
Hide Geometric icons on all objects if they are hidden.
 Linear (Parametric\Dimensional panel)
Command: DCLINEAR
Use this command to maintain the gap between two Constraints points of same object or two different objects. Both horizontal(X-Axis) and Vertical(Y-Axis) distance is fixed between two points. Following are the valid Constraint Objects and Points
· Line
· Polyline Segment
· Arc
· Two Constraint Points on Object
When a line or an Arc is selected, the horizontal or vertical distance between the end points of the object is Constrained
Following is the procedure to apply this constraint Click the Constraint Tool
· Select First Point or Object
· Select Second Point or Object
· Specify the dimension line location. Make changes in dimension value, if needed and press ENTER Key.
Now the distance between both the points must be maintained. If one point is moved then second automatically gets moved according to First Point.
![clip_image062[1] clip_image062[1]](https://blogger.googleusercontent.com/img/b/R29vZ2xl/AVvXsEjlyD35idl3gpg4sqM4YEcgI1txgQ1q9kdRWhAWDxq7ovYPIDGXoKJKhygGzaDFuAEYe-VEXMDYoW8u2mOtiSMmsQb3_41xlKYJycyAKaHAAYZUc_juMLF0uwZloGGIpqh6mS9bvPm3is1h/?imgmax=800) Horizontal (Parametric\Dimensional panel)
Horizontal (Parametric\Dimensional panel)
Command- DCHORIZONTAL
This command is same as previous but maintain only horizontal distance.
 Vertical (Parametric\Dimensional panel)
Command- DCVERTICAL
This command is same as previous but maintain only vertical distance.
 Aligned (Parametric\Dimensional panel)
Command: DCALIGNED
This command also works like the previous Horizontal and Vertical distance constraints with some additional options. In this Constraint, dimension line is aligned with two points, instead of Horizontal or Vertical. Following are the valid Constraint Objects and Points
· Line
· PolyLine Segment
· Arc
· Two Constraint points on Objects
· Line and Constraint Point
· Two Lines
Following are the command prompt option sued in different situations
a. Constraint Point or Objects- These two options are used same as previous Horizontal or Vertical Constraint.
b. Point and Line- When a line and constraint point are selected, the distance between the point and the closest point on the line is Constrained
c. 2 Lines- When two lines are selected, the lines are made parallel and the distance between them is constrained
 Radius (Parametric\Dimensional panel)
Command- DCRADIUS
Use this constraint to fix the radius of any Circle or Arc to any specific value. Following are the valid Constraint objects and Points
· Points
· Circle
· Arc
Following is the procedure to apply this constraint
· Click the Constraint Tool
· Select Arc or Circle Object
· Specify Dimension line location and make changes in dimension value if needed and Press ENTER Key
Now the radius of the selected object is locked and cannot be changed
 Diameter (Parametric\Dimensional panel)
Command- DCDIAMETER
Use this constraint to fix the radius of any Circle or Arc to any specific value. Following are the valid Constraint objects and Points
· Points
· Circle
· Arc
Following is the procedure to apply this constraint
· Click the Constraint Tool
· Select Arc or Circle Object
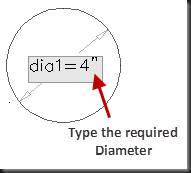
· Specify Dimension line location and make changes in dimension value if needed and Press ENTER Key
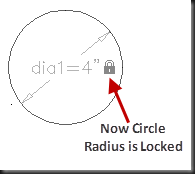
Now the radius of the selected object is locked and cannot be changed
 Angular (Parametric\Dimensional panel)
Command- DCANGULAR
This constraint is used to fix the Angle between line and Polyline Segments, swept out angle between Arc End Points or the angle between three Points on objects. Following are the valid Constraint Objects and Points
· Pair of Lines
· Pair of PolyLine Segments
· Three Constraint Points
· Arc
Following command prompt options are used in different situations:
a. Line: When two lines are selected, the angle between the line is constrained(Fixed)
b. Arc: When an Arc is selected, a three point angular Constraint is created. The Angle Vertex is the center of the Arc and the angle End Points of the Arc are the endpoints of the Arc
c. 3 Point: When three Constrain Points are specified then First Point is the Angle Vertex and other two are the end Points of the Angle
 Convert (Parametric\Dimensional panel)
Command: DCCONVERT
Use this tool to convert any Associative Dimensions to Dimensional Constraints to that Object. Non-Associative dimensions cannot be converted into Constraints
Following is the procedure to apply this constraint
· Click the Constraint tool
· Select Dimension Object
Now this dimension value is locked for that object
![clip_image058[1] clip_image058[1]](https://blogger.googleusercontent.com/img/b/R29vZ2xl/AVvXsEgHEoCN1AFzcg4t7DKeOFqAorBGNAsRpy3o3AtnYcp-2vBC13Ah-GHno68ovSxs-moD7ZwjNAzUpCl70JCwhkKpvBb4A0gwzyw_7EJ8Nt7WNB_6v9uXX-RijEhfcy-VVjA26xvn2YsBu7Zr/?imgmax=800) Show / Hide Dimensional Constraints (Parametric\ Dimensional panel)
Show / Hide Dimensional Constraints (Parametric\ Dimensional panel)
Command- DCDISPLAY
Use this tool to show or hide Constraint icons from selected objects.
Following is the procedure to apply this constraint
· Click the Tool
· Select Objects
![clip_image059[1] clip_image059[1]](https://blogger.googleusercontent.com/img/b/R29vZ2xl/AVvXsEgCezhBYJ1b4AjylcmaBbBd7_KKv26a09kgkufz3PtVv0oi78RZ3Up3YX5OvlA1TxjCCUkLwZrO_LMVrZWHngP01khrHYriGJnGvqM-Rw-2rct6w3dAZLb6etdeMGs6BwvJUZjIed8lvR4A/?imgmax=800) Show all Dimensional Constraints (Parametric\ Dimensional panel)
Show all Dimensional Constraints (Parametric\ Dimensional panel)
Command- DCDISPLAY
Show Dimensional icons on all objects if they are hidden.
![clip_image060[1] clip_image060[1]](https://blogger.googleusercontent.com/img/b/R29vZ2xl/AVvXsEjfjyp23AK0bdZnyZHobqv-5ZntCQuprsAM25I5f1v9-wR90hAlE17cAjandHJlHehrGxPw9UjTg_eaYw239dswVqPzISNvq2eJa3oKx37saQUqk918Ktdb2tYA7QQmOzTzAjufIo7GDMR6/?imgmax=800) Hide all Dimensional Constraints (Parametric\ Dimensional panel)
Hide all Dimensional Constraints (Parametric\ Dimensional panel)
Command- DCDISPLAY
Hide Dimensional icons on all objects if they are hidden.
 Delete (Parametric\Manage panel)
Command: DELCONSTRAINT
Remove all geometric and dimensional constraints from selected objects. The number of constraints removes the arc displayed on the Command Line
Following is the procedure to apply this constraint
· Click the Constraint Tool
· Click on object that have Constraint applied. Press ENTER to finish the selection
· Now Constraints are deleted from selected objects
 Parametric Manager (Parametric\Manage panel)
Command: PARAMETERS
Parameters is the named value also called a variable. These parameters are used in Constraints to supply any other objects parameters or any user defined value.
This tool opens the Parameter Manager Dialog Box. The Parameter Manager Palette displays all associative variables(Dimensional Constraint Variable and User defined Variable) available in Drawing. You can create, edit, rename, group and delete associative variables.

1) Name- Displays the Variable Name. Double Click this field to set new name.
2) Expression- Displays the real number or the equation for the expression. Example: 2-3 7 or r1+2 where r1 is the declared variable that have some defined value and now supply its value to define another variable. Double Click in this field to set New Value.
3) Value; Display the value of expression
For Example, if you want to set any line length 2’ more than any other line then you can set dimension constraint to define the length of the line as,
Length of Line2 = Length of Line 1 + 2’
To do so, you have to first add new dimension constraint to line1. This will give it a parameter name. You can use this name to set dimension constraint using previous parameter

For example:


In the design phase of a project, Constraints provide a way to enforce requirements. Changes made to objects can adjust other objects automatically and restrict changes to distance and angle values. There are two types of Constraints:
1. Geometric Constraint- These constraints control the relationships of objects with respect to each other.
2. Dimensional Constraint- These constraints control the distance, length, angle and radius values of objects.
Using Constraints you can
· Maintain design specification and requirement by constraining the geometry with a drawing.
· Apply multiple geometric constants to object instantly
· Include Formula and Equations within dimensional Constraints.
· Make design changes quickly by changing the value of a variable.
To get the full advantage of Parametric Constraints, First apply geometric constraints to determine the shape of a design and then apply dimensional constraints to determine the size of size of objects in a design.
Geometric Constraints
How to match points (coincident) of two objects
Tool :Command- GCCOINCIDENT
Constraints two points to coincide or a point to lie anywhere on an object or the extension of an object or the extension of an object
Following are the valid constraints objects and points
· Line
· PolyLine Segment
· Circle
· Arc
· Polyline Arc
· Ellipse
· SPLine
· Two valid constraint points
Following is the procedure to apply this constraint
· Click the constraint tool
· Select first point or object
· Select second point or object
The second selected point or object is made coincident to the first
How to make objects in a same line (Collinear)
Tool:Command- GCCOLLINEAR
Using this constraint, you can make two objects to lie along the same line. Following are the valid constraint object and points
· Line
· PolyLine
· Ellipse
· MultiLine Text
Following is the procedure to apply this constraint
· Click the Constraint tool
· Select First Object
· Select Second Object
The Second selected Object is mode collinear with the first line
How to match Center Points (Concentric) of two objects
Tool:Command: GCCONCENTRIC
Add this constraint on Circles, Arcs or Ellipse to maintain the same center Point. Following are the Valid Constraint Objects and Points
· Circle
· Arc
· PolyLine Arc
· Ellipse
Following is the procedure to apply this constraint
· Click the Constraint Tool
· Select First Object
· Select Second Object
The second selected object is made concentric with the First Object
How to lock the point of an object
Tool:Command: GCFIX
Use this Constraint to Fix Point of any object. For Example, you can Fix End Point of any Line segment to lock the End Point on that place.
When you apply the FIX Constraint to a point on an object, you lock the point in place. You can move the object around the locked point.
When you apply the Fix Constraint to an object, the object is locked and cannot be moved. Following are the valid constraints Objects and Points-
· Line
· Polyline Segment
· Circle
· Arc
· PolyLine Arc
· Ellipse
· SPLine
Following is the procedure to apply this constraint
· Click the Constraint tool
· Select point or Object
Now the selected point is locked in place and cannot be moved.
How to make one object Parallel to Another Object
Tool:Command: GCPARALLEL
Use this Constraint t parallel one object like line to another Line Object. Following are the Valid Constraint objects and Points
· Line
· Polyline Segment
· Ellipse
· MultiLine Text
Following is the procedure to apply this constraint
· Click the Constraint Tool
· Select First Object
· Select Second Object
The Second selected Object is made parallel to the First.
How to perpendicular one line to another
Tool:Command- GCPERPENDICULAR
Use this tool to create one line object or Polyline Segment to maintain 900 Angle with another line object o Polyline segment. Following are the valid Constraint objects and Points
· Line
· Polyline Segment
· Ellipse
· MultiLine Text
Following is the procedure to apply this constraint
· Click the Constraint Tool
· Select First Object
· Select Second Object
The second selected object is made perpendicular to the First
How to make any object Parallel to X-Axis
Tool-Command – GCHORIZONTAL
Use this Constraint to make any line object or segment of line object(2 Points) parallel to X Axis. Following are the valid constraint objects and Points
· Line
· Polyline Segment
· Ellipse
· Multiline Text
· Two Valid Constraint Points
Following is the procedure to apply this constraint
· Click the Constraint tool
· Select any object or two valid constraint points on object
The second selected point on an object is made horizontal to the first selected point. In case of Object selection, far endpoint from selection point is made horizontal.
Method-1: Using Object


Method-2: Using 2 Points


How to make copy of any object parallel to Y Axis
Tool-Command – GCVERTICAL
Use this Constraint to make any line object or segment of line object(2 Points) parallel to Y Axis. Following are the valid constraint objects and Points
· Line
· Polyline Segment
· Ellipse
· Multiline Text
· Two Valid Constraint Points
Following is the procedure to apply this constraint
· Click the Constraint tool
· Select any object or two valid constraint points on object
The second selected point on an object is made horizontal to the first selected point. In case of Object selection, far endpoint from selection point is made vertical.
Method-1: Using Object


Method-2: Using 2 Points

![clip_image034[1] clip_image034[1]](https://blogger.googleusercontent.com/img/b/R29vZ2xl/AVvXsEhiny9-wQnzvD029RQlabJJOL6yEpvBL5JsT-OT_B1gyiaHgl-US07kZuimmPU4r_9HoIUXVUqseAt6xQk02bdB5eMtCiYSly20S801D36LypGmn4TGPqJJTL-q1CejeOP2ZigL2X189Vzq/?imgmax=800)
How to create and maintain Tangency point for a Circle or Arc
Tool:Command: GCTANGENT
Use this command to create one object to Tangent to another Object Line or Arc. In case of any change in one object, they must maintain tangency with each other. Following are the valid Constraints Objects and Points
· Line
· PolyLine segment
· Circle, Arc, Polyline Arc, Ellipse
· Combination of Circles, Arcs or Ellipse.
A Circle can be tangent to a line even if the circle does not touch the line. A curve can be tangent to another even if they do not physically share a point.
Following is the procedure to apply this constraint
· Click the Constraint Tool
· Select First Object
· Select Second Object
Now both objects maintain tangency to each other even they change their dimensions
How to smoothly match end point of one SPLine object with another Line Object
Tool:Command- GCSMOOTH
Using this Constraint you can match(coincident) any SPLine object’s end point smoothly and contiguous with another SPLine, Line, Arc or PolyLine
Following are the valid Constraint Objects and Points-
· Spline
· Line
· PolyLine Segment
· Arc
· PolyLine Arc
Following is the procedure to apply this constraint
· Click the Constraint Tool
· Select First Object(must be SPLine)
· Select Second Object
The Second selected object is made G2 continuous with the First SPLine.


How to make one object Symmetric to another object with reference to the selected Line
Tool:Command: GCSYMMETRIC
Using this constraint you can make two objects symmetric with reference to the selected line called Symmetry Line.
For Lines, the Line’s Angle is made Symmetric and not the end points. For Arcs and Circles, the Center and the Radius are made Symmetric and not the end Point of the Arc.
Following are the valid Constraint Objects and Points
· Line
· PolyLine Segment
· Circles
· Arc
· PolyLine Arc
· Ellipse
Following is the procedure to apply this constraint
· Click the Constraint Tool
· Select the First Point or Object
· Select Second Point or Object
· Select Symmetric Line
The Second Point or Object is made Symmetric to First Point or Object with reference to Symmetry Line.
How to make one Object equal to another Object
Tool:Command- GCEQUAL
Resize selected arcs and circles to the same radius or selected line to the same length. Following are the valid Constraint Object and Point
· Line
· PolyLine segment
· Circle
· Arc
· PolyLine Arc
Following is the procedure to apply this constraint
· Click the Constraint Tool
· Select First Object
· Select Second Object
The second Object is made equal to the First Object
How to Apply Specified Constrain Automatically depending on the type of object
Tool:Command: AUTOCONSTRAIN
Use this command to apply constraint based on specified priority depending on the type of object. The following condition are checked before multiple geometric constraint are applied-
1. Are the objects perpendicular or tangential to each other within the specified tolerances
2. Do they also intersect within the specified tolerances
By pressing ‘S’, you can open the Auto Constrain dialog Box to change priority and other properties

Controls the constraints that are applied to a selection set, and the order in which they are applied when using the AUTOCONSTRAIN command.
The following conditions are checked before multiple geometric constraints are applied:
· Are the objects perpendicular or tangential to each other within the tolerances specified in the AutoConstrain tab?
· Do they also intersect within the specified tolerances?
If the first condition is met, then tangent and perpendicular constraints are always applied if the check boxes are cleared.
Autoconstrain Headings
· Priority — Controls the order in which constraints are applied.
· Constraint Type — Controls the type of constraint applied to objects.
· Apply — Controls the constraints that are applied when applying constraints to multiple objects.
Move Up
Changes the order of the selected item by moving it up in the list.
Move Down
Changes the order of the selected item by moving it down in the list.
Select All
Selects all geometric constraint types to autoconstrain.
Clear All
Clears all geometric constraint types to autoconstrain.
Reset
Resets AutoConstrain settings to default values.
Tangent Objects Must Share an Intersection Point
Specifies that two curves must share a common point (as specified within the distance tolerance) for the tangent constraint to be applied.
Perpendicular Objects Must Share an Intersection Point
Specifies that lines must intersect or the endpoint of one line must be coincident with the other line or endpoint of the line as specified within the distance tolerance.
Tolerances
Sets the acceptable tolerance values to determine whether a constraint can be applied.
· Distance — Distance tolerance are applied to coincident, concentric, tangent, and collinear constraints.
· Angle — Angular tolerance are applied to horizontal, vertical, parallel, perpendicular, tangent, and collinear constraints.
Following is the procedure to apply this constraint
· Click the Constraint Tool
· Select the Object
How to ON/OFF display of Geometric Constants icons on Object
Tool:Command- CONSTRAINTBAR
Use this tool to show or hide Constraint icons from selected objects.
Following is the procedure to apply this constraint
· Click the Tool
· Select Objects
How to show Geometric Constraint icons on all Objects
Tool:Command- CONSTRAINTBAR
Show Geometric icons on all objects if they are hidden.
How to hide Geometric Constraint icons on all Objects
Tool:Command- CONSTRAINTBAR
Hide Geometric icons on all objects if they are hidden.
Dimensional Constraints
How to maintain a specific distance (Horizontal and Vertical both) between two points
Tool:Command: DCLINEAR
Use this command to maintain the gap between two Constraints points of same object or two different objects. Both horizontal(X-Axis) and Vertical(Y-Axis) distance is fixed between two points. Following are the valid Constraint Objects and Points
· Line
· Polyline Segment
· Arc
· Two Constraint Points on Object
When a line or an Arc is selected, the horizontal or vertical distance between the end points of the object is Constrained
Following is the procedure to apply this constraint Click the Constraint Tool
· Select First Point or Object
· Select Second Point or Object
· Specify the dimension line location. Make changes in dimension value, if needed and press ENTER Key.
Now the distance between both the points must be maintained. If one point is moved then second automatically gets moved according to First Point.
How to maintain a specific Horizontal distance between Two Points
Tool:Command- DCHORIZONTAL
This command is same as previous but maintain only horizontal distance.
How to maintain a specific Vertical distance between Two Points
Tool:Command- DCVERTICAL
This command is same as previous but maintain only vertical distance.
How to use Aligned Constraint
Tool:Command: DCALIGNED
This command also works like the previous Horizontal and Vertical distance constraints with some additional options. In this Constraint, dimension line is aligned with two points, instead of Horizontal or Vertical. Following are the valid Constraint Objects and Points
· Line
· PolyLine Segment
· Arc
· Two Constraint points on Objects
· Line and Constraint Point
· Two Lines
Following are the command prompt option sued in different situations
a. Constraint Point or Objects- These two options are used same as previous Horizontal or Vertical Constraint.
b. Point and Line- When a line and constraint point are selected, the distance between the point and the closest point on the line is Constrained
c. 2 Lines- When two lines are selected, the lines are made parallel and the distance between them is constrained
How to lock the radius of a circle or Arc
Tool :Command- DCRADIUS
Use this constraint to fix the radius of any Circle or Arc to any specific value. Following are the valid Constraint objects and Points
· Points
· Circle
· Arc
Following is the procedure to apply this constraint
· Click the Constraint Tool
· Select Arc or Circle Object
· Specify Dimension line location and make changes in dimension value if needed and Press ENTER Key
Now the radius of the selected object is locked and cannot be changed
How to lock the diameter of a circle or Arc
Tool :Command- DCDIAMETER
Use this constraint to fix the radius of any Circle or Arc to any specific value. Following are the valid Constraint objects and Points
· Points
· Circle
· Arc
Following is the procedure to apply this constraint
· Click the Constraint Tool
· Select Arc or Circle Object
· Specify Dimension line location and make changes in dimension value if needed and Press ENTER Key
Now the radius of the selected object is locked and cannot be changed
How to Fix the Angle between two Objects
Tool:Command- DCANGULAR
This constraint is used to fix the Angle between line and Polyline Segments, swept out angle between Arc End Points or the angle between three Points on objects. Following are the valid Constraint Objects and Points
· Pair of Lines
· Pair of PolyLine Segments
· Three Constraint Points
· Arc
Following command prompt options are used in different situations:
a. Line: When two lines are selected, the angle between the line is constrained(Fixed)
b. Arc: When an Arc is selected, a three point angular Constraint is created. The Angle Vertex is the center of the Arc and the angle End Points of the Arc are the endpoints of the Arc
c. 3 Point: When three Constrain Points are specified then First Point is the Angle Vertex and other two are the end Points of the Angle
How to connect Normal Dimension into Dimensional Constraints
Tool:Command: DCCONVERT
Use this tool to convert any Associative Dimensions to Dimensional Constraints to that Object. Non-Associative dimensions cannot be converted into Constraints
Following is the procedure to apply this constraint
· Click the Constraint tool
· Select Dimension Object
Now this dimension value is locked for that object
How to ON/OFF display of Geometric Constants icons on Object
Tool:Command- DCDISPLAY
Use this tool to show or hide Constraint icons from selected objects.
Following is the procedure to apply this constraint
· Click the Tool
· Select Objects
How to show Dimensional Constraint icons on all Objects
Tool:Command- DCDISPLAY
Show Dimensional icons on all objects if they are hidden.
How to hide Geometric Constraint icons on all Objects
Tool:Command- DCDISPLAY
Hide Dimensional icons on all objects if they are hidden.
How to Delete Constraint from Object
Tool: Delete (Parametric\Manage panel)
 Command: DELCONSTRAINT
Remove all geometric and dimensional constraints from selected objects. The number of constraints removes the arc displayed on the Command Line
Following is the procedure to apply this constraint
· Click the Constraint Tool
· Click on object that have Constraint applied. Press ENTER to finish the selection
· Now Constraints are deleted from selected objects
What is a Parameter.? How to use Parameters in Parametric Constraints?
Tool: Parametric Manager (Parametric\Manage panel)
 Command: PARAMETERS
Parameters is the named value also called a variable. These parameters are used in Constraints to supply any other objects parameters or any user defined value.
This tool opens the Parameter Manager Dialog Box. The Parameter Manager Palette displays all associative variables(Dimensional Constraint Variable and User defined Variable) available in Drawing. You can create, edit, rename, group and delete associative variables.

1) Name- Displays the Variable Name. Double Click this field to set new name.
2) Expression- Displays the real number or the equation for the expression. Example: 2-3 7 or r1+2 where r1 is the declared variable that have some defined value and now supply its value to define another variable. Double Click in this field to set New Value.
3) Value; Display the value of expression
For Example, if you want to set any line length 2’ more than any other line then you can set dimension constraint to define the length of the line as,
Length of Line2 = Length of Line 1 + 2’
To do so, you have to first add new dimension constraint to line1. This will give it a parameter name. You can use this name to set dimension constraint using previous parameter

For example:


