How to add Dimensions with different types of objects
Following are the different ways to add dimension with drawing objects-1. Linear Dimension
Tool-
Command- DIMLINEAR


This command creates a linear description with a horizontal, vertical or rotated dimension line.
Command Prompt Options
1. Specify First Extension Line Origin: Specify the First Point from where dimension line starts.
2. Specify Second Extension Line Origin- Specify the end point of the dimension line.
3. Select Object- If you want to create dimension from both end points of objects then press ENTER at the time of first extension line and then select object.
When you select object, this command automatically determines the origin points of the first and second extensions lines. For Example, if you select a circle, the diameter endpoints are used as the origins of the extension.

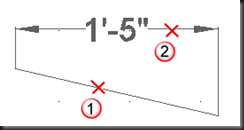
4. Specify Dimension Line location or MTEXT/Text/Angle/Horizontal/Vertical/Roated- Pick a point to place the dimension line. If you want to change settings of dimension line and dimension text, choose following
· MText: Display the In-Place text Editor which you can use to edit the dimension text.


· Text: Same as MText but changes the text at Command Prompt.
· Angle: Changes the Angle of Dimension Text. Specify required Angle with reference to default X-Axis.


· Horizontal-Create Horizontal Linear Dimensions. You can change MText, Text and Angle within Horizontal option.
· Vertical- Create Vertical Linear Dimensions. You can change MText, Text and Angle within Vertical option.

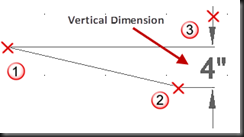
· Rotated: Creates rotated linear dimensions. This option asks for Angle to rotate the extension line about specified Angle.


2. Aligned Dimension
Tool:
Command: DIMALIGNED


This command creates a linear dimension that is aligned with the origin points of the extension lines. All command prompt options available have the same meaning as explained in the Linear Dimension.
3. Angular Dimension
Tool:
Command: DIMANGULAR


This command measures the angle between selected object or 3 Points. Objects which can be selected includes Arcs, Circles and Lines. All command prompt options available have the same meaning as explained in the Linear Dimension.
One additional option is available in this dimension that will help to fix the quadrant for which dimension is required. Using this option you can create dimension text outside the angular area.


4. Arch Length Dimension
Tool :
Command DIMARC


Create an arc length dimension. All command prompt options available have the same meaning as explained in the Linear Dimension.
New Prompt options are:
1. Partial- Reduces the length of the arc length dimension


2. Leader- Adds a leader object. This option is displayed only if arc is greater than 90 degree.
3. No Leader- Cancels the leader option before the leader is created.
5. Radius Dimension
Tool:
Command: DIMRADIUS

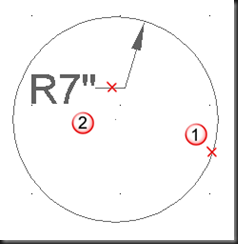
This command measures the radius of a selected circle or arc and displays the dimension text with a radius symbol in front of it. All command prompt options available have the same meaning as explained in the Linear Dimension.
6. Diameter Dimension
Tool:
Command: DIMDIAMETER


This command measures the diameter of a selected circle or arc and displays the dimension text with a diameter symbol in front of it. All command prompt options available have the same meaning as explained in the Linear Dimension.
7. Jogged Dimension
Tool:
Command: DIMJOGGED

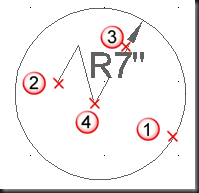
This command measures the radius of the selected circle or Arc and display the dimension text with a radius symbol in front of it. Creates jogged radius dimension when the center of an arc or circle is located off the layout and cannot be displayed in its true location.
This command asks for a new center point for a jogged radius dimension that takes place of the true center point of the Arc or Circle.
8. Ordinate Dimension
Tool:
Command: DIMORDINATE


This dimension command measures the horizontal or vertical distance from an origin point called the datum to a feature. This is used to show comparative increments between multiple dimension points. All command prompt options available have the same meaning as explained in the Linear Dimension. Pick a Point on Screen to measure when asks for “Specify Feature Location”. Specify Xdatum to show horizontal distance from origin and Ydatum to show vertical distance from origin.
How to break dimension line when line overlaps any other objet
Tool:Command: DIMBREAK


This command breaks or restores dimension and extension lines when they cross other objects. Dimension breaks can be added to linear, angular and ordinate dimensions
Command Prompt Options
a. Select a dimension to add/remove break or multiple: Select a dimension or enter ‘m’ to select multiple dimension
b. Select object to break dimension or Auto/Manual/Rename- First select any one of the following three available option:
· Auto- Places dimension breaks automatically at all intersection points of the objects that intersect the selected dimension. Any dimension break created using this option is updated automatically when the dimension or an intersecting object is modified.
· Manual- Places a dimension break manually when targeted object is not intersecting the dimension line. You specify two points on the dimension or extension lines for the location of the break. This break is not automatically updated and you can only place a single manual dimension break at a time.
· Remove- Remove all dimension breaks from the selected dimension
Note: After selecting any of the option, select intersecting object
How to make equal space between multiple dimension lines
Tool:Command: DIMSPACE


This command adjusts the spacing between linear or angular dimensions. The spacing between parallel dimension lines is made equal. You can also make the dimension lines of a series of linar or angular dimensions line up by using a spacing value of 0
Command Prompt Options
a) Select Base Dimension: Select a parallel linear or angular dimension
b) Select dimension to space- select all dimension to equally space from the base dimension and press Enter Key to finish selection.
c) Enter Value or Auto- Specify a spacing distance or select Auto to calculate spacing distance automatically based on the text height of the selected base dimension
How to create a series of continued dimensions
Tool:Command: QDIM


This command creates a series of dimensions quickly from selected points. This command helps to create continued dimensions. You can also create series of dimensions for Circle and Arcs.
Command Prompt Options
1)Select geometry to dimension: Select the objects you want to dimension or the dimensions you want to edit and press ENTER
2)Specify dimension line position, or [ Continuous/ Staggered/ Baseline/ Ordinate/ Radius/ Diameter/ datumPoint/ Edit/ seTtings] <current>: Enter an option or press ENTER
3)Continuous: Creates a series of continued dimensions.
4)Staggered: Creates a series of staggered dimensions.
5)Baseline: Creates a series of baseline dimensions.
6)Ordinate: Creates a series of ordinate dimensions.
7)Radius: Creates a series of radius dimensions.
8)Diameter: Creates a series of diameter dimensions.
9) Datum Point: Sets a new datum point for baseline and ordinate dimensions.
Select new datum point: Specify a point
10)Edit: Edits a series of dimensions. You are prompted to add or remove points from existing dimensions.
Indicate dimension point to remove, or [Add/eXit] <eXit>: Specify a point, enter a, or press ENTER to return to the previous prompt
11)Settings: Sets the default object snap for specifying extension line origins. The following prompt is displayed:
Associative dimension priority [Endpoint/Intersection]
How to create a dimension line in continuation of previously created dimension
Tool:Command: DIMCONTINUE


This command automatically continues creating additional dimensions from the last linear, angular or ordinate dimension created or from a selected extension line. The dimension lines are lined up automatically.
Command Prompt Option
a. Select continued dimension-select a linear, ordinate or angular dimension or press enter to continue from last created dimension line.
b. Specify a second extension line origin or UNDO/Select- This prompt is displayed when selected base dimension is linear or angular. Pick a second point to continue to create dimension. Use UNDO to remove previous actions
c. Specify features location or UNDO/Select- This prompt is displayed when selected base dimension is ordinate. Press Enter key to finish the command.
How to create a dimension in continuation Always from baseline of previously created dimension
Tool:Command: DIMBASELINE


This command automatically continues creating additional dimensions from the last linear, angular or ordinate dimension created or from a selected extension line. All the dimensions are created from the existing dimension’s endpoint. This endpoint is treated as a basepoint. The dimension lines are lined up automatically. Command prompt options are same as previous command
How to add Inspection Information with any object when dimension value and its tolerance is critical
Tool:Command: DIMINSPECT


This command converts selected dimension into Inspection Dimension and add necessary information like Frequency of Inspection. This command shows the following inspection dialog box:

Select Dimensions
Specifies the dimensions that an inspection dimension should be added to or removed from.
Remove Inspection
Removes the inspection dimension from the selected dimension.
Shape
Controls the shape of the frame that is drawn around the label, dimension value, and inspection rate of the inspection dimension.
Round
Creates a frame with semi-circles on the two ends; the fields within the frame are separated by vertical lines.
Angular
Creates a frame with lines that form a 90-degree angle on the two ends; the fields within the frame are separated by vertical lines.
None
Specifies that no frame is drawn around the values; the fields are not separated by vertical lines.
Label/Inspection Rate
Specifies the label text and inspection rate for an inspection dimension.
Label
Turns the display of the label field on and off.
Label Value
Specifies the label text.
The label is displayed in the leftmost section of the inspection dimension when the Label check box is selected.
Inspection Rate
Turns the display of the rate field on and off.
Inspection Rate Value
Specifies how frequently a part should be inspected.
The value is expressed as a percentage, and the valid range is 0 to 100. The inspection rate is displayed in the rightmost section of the inspection dimension when the Inspection Rate check box is selected.
How to update all dimensions to match with current settings of dimension styles
Tool:Command: DIMSTYLE
This command updates the selected dimension object with the current dimension style
How to represent long continues distance symbolically
Tool:Command: DIMJOGLINE


This tool adds or removes a jog line on a linear or aligned dimension. Jog lines in a dimension indicates a break in the object being dimensioned. The dimension value represents the actual distance instead of measured value. You can change dimension value using MText or text option of dimension command.
Command Prompt Options
a. Select dimension to add jog or remove- Select dimension object to add the jog or type Remove before selection dimension object to delete the jog.
b. Specify jog location or press Enter- Specify a point on dimension line to add a jog or Press Enter Key to add jog in the middle of the dimension line with reference to dimension text.
How to associate or Reassociate dimension to object
Tool:Command: DIMREASSOCIATE


Associates or reassociates selected dimensions to objects or points on objects. Each selected dimension is highlighted in turn, and prompts for association points appropriate for the selected dimension are displayed.
A marker is displayed for each association point prompt.
·If the definition point of the current dimension is not associated to a geometric object, the marker appears as an X
·if the definition point is associated, the marker appears as an X inside a box.
How to indicate possible tolerance values with dimension values
Tool:Command: TOLERANCE


Add a geometric tolerance value contained in a frame with any geometric value. This will show you the following geometric tolerance dialog box-

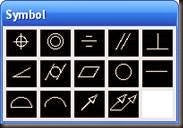
Select formatting symbol and tolerance value to add in drawing.
No comments:
Post a Comment