Introduction
Workspace is the area like the drawing sheet where the concept and ideas take shapes. To do so we need a perfect working space, tools and utilities. In this chapter we discuss setting up working space as per our requirements and different other available options.
Following are the steps required to setup a workspace:
- Set working units(To perform correct measurements)
- Limits setup(To specify the drawing sheet size)
- Grid setup(To visualize the size of drawing sheet and measurement)
After following these three steps of workspace settings, you are now able to develop a drawing with accuracy and ease. Now we discuss each setting in detail.
Setting up Units
Unit is required to measure anything. For the purpose of Civil, Architectural and Mechanical we need different units of measurement. For example mechanical drawings require measurement in decimal, but civil and architectural drawings require measurement in feet and inches.
There are two methods to execute commands in AutoCAD i.e. by typing command in command window or select the tool from Ribbon. The most preferred way is to use command window because command options can be selected only from command window.
Method-1
Select Unit Setup from Application Button\Drawing Utilities\Units.
Method-2 (Recommended)
Execute command by typing the command name in command window.
In general AutoCAD commands display command prompts after executing the command but this command displays a following Dialog Box instead of command prompts:
Above dialog box of drawing units display different measurement styles required at the time of drawing, inserting objects and lighting. Drawing units are required to draw objects using Drawing Tools and it requires Length and Angle specification.
Length Specification: Select type of unit to specify length of any object. Following are the units available for real world applications-
· Architectural – Architectural formats produce feet and inches display used specially in architectural purpose like building and map design. This format assumes that each drawing unit represents one inch. Format Example: 2’3 1/8” (here single quote(‘) indicate Feet and Double quote(“) indicate Inch)
· Engineering – This is same as Architectural unit with a difference in fraction part format. Fractions are displayed in decimal in engineering unit. Format example: 2’ 3.6”
· Decimal - This unit used to represent any real world object. Format Example: 2.3
· Fractional - This unit format is also representing any real world object. Format Example: 2 1/16
· Scientific – This unit format is also represent any real world object. Format Example: 2.56E+02. Where E means exponential and represents 10 to the power 2 i.e. (10)2.
Note: Precision is the degree of accuracy, we can specify using precision pull down list of length measurement.
Angle Measurement: Here we can specify the angle measurement format. Different available formats are:
Decimal Degree – This is the most common format of Angle measurement measure in metric units. In a complete circle there are three hundred and sixty degrees (360). For Example 3”<45.36 means 3” is the length of object and 45.36 is the angle between object and x-axis. Here fraction part is represented in decimal format in which 1 degree is subdivided into 10/100/1000 levels according to selected precision level. The size of the angle in this case would be forty-five full degrees plus Thirty-six hundredths of an additional degree. ‘<’ symbol is used to specify Angle parameter.
Deg/Min/Sec – In this format the degree (d) is divided into sixty parts called minutes (‘). These minutes are further divided into sixty parts called seconds (“). The size of an angle could be stated this way: 45 degrees, 20 minutes, 30 seconds. There are symbols that are used when specifying angles using degrees, minutes, and seconds. So, the angle of 45 degrees, 20 minutes, 30 seconds is written like: 45d20’30”.
Grads – In a complete circle there are 400 grads (g). Each quadrant of a circle is assigned a range of 100 grads, which eases recognition of the four quadrants, as well as arithmetic involving perpendicular or opposite angles. For Example 3”<50g means object length is 3 inches and angle specification is 50 grads i.e. 45 degree because one quadrant is of 100 grads.
Radians – Radian(r) is the standard unit of angular measurement in mathematics. For this measurement, consider the unit circle (a circle of radius 1) whose centre is the vertex of the angle. Then the angle cuts off an arc of the circle, and the length of that arc is the radian measure of the angle. The circumference of the entire circle is 2 (
( is about 3.14159), so it follows that 360° equals 2
 radians. Hence, 1° equals
  /180 radians and 1 radian equal 180/
 degrees. For example 3”<0.7854r means object length is 3 inches and angle is 0.7854 radians i.e. 45 degree (0.7854 x (180/
 )).
)).
Surveyor’s unit – This is the unit for surveyors developing maps and boundaries. It is like a unit of compass. Example format 3”<N 45dE.
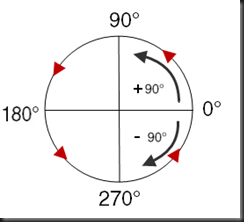
Angle Direction: By default positive angle measurement direction is counter-clockwise and negative angle measurement is clockwise. By enabling Clockwise checkbox we are eligible to measure and specify positive angle as clockwise.
Counter-Clockwise Direction Clockwise Direction
Insertion Scale: This is the unit used to scale the objects inserted from external files. For example blocks (discuss later) and drawing files. Scaling is needed when inserted object measurement unit is mismatched with existing file measurement unit. Select “Unitless” from the pull down list to insert the object without scaling it to match the current drawing unit.
Sample Output: Demonstrate the selected unit formats for length and angle measurement.
Lighting: Select the light intensity measurement unit if you are working in 3D visualization. This setting is only required for 3D users. This pull down gives following options-
· International
· American
· Generic
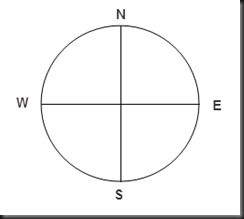
Direction Button: This button displays the direction control dialog box. Using this dialog box we can change the base line of measurement. By default ‘East’ (X-axis) is the default base line for measurement purpose. Here we can change baseline to North, West, South or any other specified angled base line by picking or typing the angle.
Tip: We only need to change the unit type to Architectural and leave all settings to default to setup units.
Limits Setup
This is done by LIMITS command. This command set the size of drawing sheet and can also restrict the working beyond the set limit.
Note: Angle bracket value is the default value if no value is entered.
Command prompt options:
1) Specify Lower Left Corner: Type starting point coordinates of drawing sheet which is in general always (0, 0). This is the default coordinate in the command, so press ENTER key to accept lower left corner as (0,0).
2) Specify Upper Right Corner: Type opposite side coordinates that contain width (x-axis) and length (y-axis) values of a drawing sheet. For example type: 25’0”, 40’0”. Here 25 feet is the width and 40 feet is the length of the plot area. You can ignore to type the inch value if it is 0.
3) ON: Type ‘ON’ and press Enter key to perform limits checking. When limits checking is ON then we can not specify point outside the limit area to draw any object. Limit command restrict the points specification outside the limit area, so any object that have a point inside the limit area can grow outside the limit area like circle, arc etc.
4) OFF: Type OFF and press Enter key to turn off limits checking. Now you can draw objects outside the limit area.
GRID setup
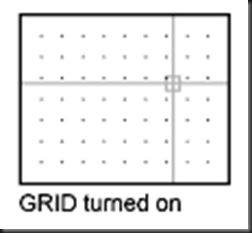
Grid is the facility to visualize the drawing area. Dotted grid is the standard grid view to work with AutoCAD but in the AutoCAD 2011 release you can view grids as a graph paper. We recommend the standard dotted grid view to easily recognize 2D objects like line, rectangle etc. Graph paper view of grid line is generally useful in 3D working, where grid provide the reference (base) plan to draw objects.
Grid view also facilitates the user to specify point direct pointing to the screen by visualizing the reference of surrounding grids. Display of grid and horizontal & vertical space between grid dots can be controlled by the user as per requirement. After specifying the space between grid points we can visually measure the length and width of object by just counting the grid dots between the objects.
Command: GRID
Command prompt options:
1) Specify grid spacing(x): Type required horizontal and vertical distance between grid dots. Type x after the value sets the grid spacing to the specified value multiplied by the snap (Cross Hair jump) interval.
2) ON: Type ON to turn on display of grid dots.
3) OFF: Type OFF to turn off display of grid dots.
4) Snap: Type ‘S’ to sets spacing of grid dots same as specified in SNAP command.
5) Major: Type ‘M’ to specify the frequency of major line in the grid. Major line is the different format line used to visualize large block size. This option is effective only when grid type is set to grid lines not grid dots. You can change grid type from grid setting dialog box discussed later in this topic.
6) aDaptive: Type ‘D’ to change the grid behaviour and grid spacing at the time of Zoom in and Zoom out.
a. Turn Adaptive behaviour ON[Yes/No]<Yes>: Type ‘Y’ to turn on dynamic behaviour of grid dots spacing at the time of Zoom out. Grid dots spacing adjust automatically to retain on the screen otherwise in case of ‘NO’ , grid dots spacing stick on specified units to display and it will give an error “Grid too dense to display” when zooming out.
b. Allow subdivision below grid spacing[Yes/No]<No>: Type ‘Y’ to turn on grid dots display on sublevels at the time of Zoom in. Sublevels means grid within grid. When we zoom in very deep inside the drawing, in general, the main grid dots may be out of screen due to specified grid spacing. In case of sublevels, when we Zoom in, grid dots automatically generated dynamically.
7) Limits: Type ‘L’ to display ON/OFF grid dots outside the specified limits. Turn on this setting only when you have outlined working area otherwise you cannot visualize your limits using grid dots because entire drawing space is filled with grid dots.
8) Follow: Changes the grid plane to follow the XY plane of the dynamic UCS.
9) Aspect: Type ‘A’ to set horizontal and vertical grid dots spacing different.
‘Aspect’ option is not available in Isometric SNAP style. You can also type ‘x’ with the specified value as a multiple of the snap interval.
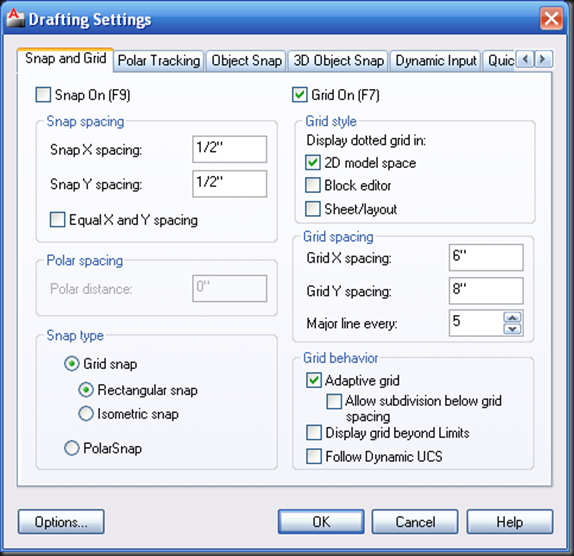
You can also set all these settings through grid setup dialog box. To do so right click on grid tool (Status Bar), select settings option and this will open the dialog box.


No comments:
Post a Comment