Drawing and selection is the most basic requirements of AutoCAD users. Now we are ready to work in AutoCAD because at this stage we have prepared a Drawing Area with appropriate drawing units. Till now we have learnt all the basic preparations and terminologies required to create a drawing and work in AutoCAD.
Here is a quick recap of all the steps required before using drawing tools to draw a plan.
1) Every 2D drawing has a width and length. Width is represented by X-axis and length is represented by Y-axis.
2) The distance and angle is measured in specified unit. Change it to Architectural using UNIT command.
3) Specify the maximum size in width and length covered by boundary of a plot area. Use LIMIT command to set the drawing size.
4) Set GRID dots to ON to visualize the drawing area.
Note: Use Zoom command then type ALL at command prompt to view entire drawing area up to the limit on a screen. We will discuss ZOOM command later.
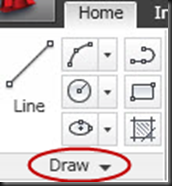


(a)Draw Panel (b) Expanded Draw Panel (c) Pin up expanded panel to lock the view
Note: “More tools” section is automatically hide when you are out of Draw panel. To retain this section on screen permanently, click pin up tool to change it in vertical position to lock the section.
Important: You don’t need to use tools if you are ready to remember the names of drawing commands. Just type the command name in command window to use it. This is the best way to get perfection in AutoCAD.
 Line Tool (Home\Draw Panel)
Command: LINE


LINE command creates straight line segments. In this command you create a series of contiguous line segments by clicking on required location visually or by typing (X, Y, Z) coordinates on command prompt. Generally, Z point is always zero in 2D drawing, so there is no need to mention it in the coordinate. Draw lines are contiguous but not connected with each other, so, you can edit each line segment separately.
Command prompt options:
1) Specify first point: Type or pick a point on screen to specify start point of a line.
2) Specify next point: Type or pick a point on screen to specify end point of a line until you don’t want to stop draw lines.
3) Continue: This is the hidden prompt. When LINE command prompts for first point, press ENTER key to continue line drawing from endpoint of the most recently drawn line. If the most recent object drawn is arc then by pressing ENTER key, LINE command pick the endpoint of arc and draw a tangent to arc.


4) Close: When you create two or more contiguous segments then this prompt is appear. This option creates a line segment from endpoint of last line segment to start point of first line segment.


5) Undo: Remove the most recent line segment from the contiguous line sequence. If you repeat this option multiple times then you can remove line segments in reverse order.
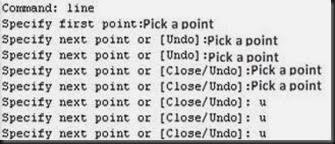


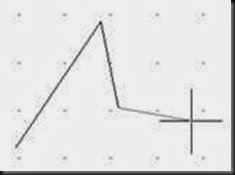

(First Undo) (Second Undo) (Third Undo)
 Rectangle Tool (Home\Draw Panel)
Command: RECTANG


RECTANG command creates a rectangle of polylines (connected with each other and closed) by specifying two opposite corners. In this command you can specify rectangle parameters like length, width and rotation. You can also control the type of corners like fillet, chamfer or square.
Command prompt options:
Options available at the time of first point specification
1) Specify first corner point: Type or Pick a point to start rectangle.
2) Chamfer: Chamfer is the diagonal cut in two edges of a corner of rectangle.


Here ‘A’ (6”) is first chamfer distance and ‘B’ (4”) is second chamfer distance asked by this option. Set A and B, then draw rectangle to get chamfered rectangle. Specified chamfered distance is now default distance for all next drawn rectangle otherwise you have to reset the distance to ‘0’.
Note: If you don’t want to chamfer all corners then draw rectangle normally and use ‘CHAMFER’ command separately which is discussed later.
3) Elevation: Elevation for any object is the distance along Z-axis i.e. the height of the object from XY-plane or any reference point. This option is used in 3D drawing and can be viewed using 3D orbit view.
4) Fillet: Fillet is the round cut in two edges of a corner of rectangle.


Here ‘R’ is the radius of a circle used to make a rounded corner rectangle. Set radius and then draw a rectangle which is filleted rectangle.
5) Thickness: Add thickness to the rectangle to create a box like shape. This is viewed in 3D and useful for 3D drawing.
6) Width: Width of a rectangle line is the thickness of the line.


Options available at the time of Second point specification
1) Specify other corner point: Type or Pick a point to finish rectangle.
2) Area: Specify area of a rectangle with any one from Length or Width. In filleted or chamfered rectangle this option count only used area and exclude cutting part. For example if you specify 864 square inches as area of a rectangle and 3’ of length then you create a rectangle of 3’x2’ in width and length.

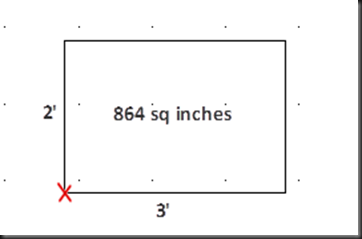
3) Dimensions: Specify Length and Width to create a rectangle from specified first corner point. After specifying dimensions, choose direction of second corner point.


4) Rotation: Specify Angle with reference to X-axis (default) to get rotated rectangle.


 Polyline Tool (Home\Draw Panel)
Command: PLINE


Polyline is a very important line object in 2D and 3D drawing. Polylines are contiguous and connected sequence of straight and/or curved (arc) line object. In connected polylines if you change length of any segment then it will affect connected segment also. All connected polyline segments are behaves like a single object. Polyline segments can have different start and end line width.
Command prompt options:
1) Specify start point: Type or pick a point to start drawing polyline.
2) Specify next point: Type or pick a point on screen to specify end point of a polyline until you don’t want to stop drawing polylines.
3) Arc: This option add arc segment to the polyline using following command prompt options:-

a. Endpoint of Arc: Specify point to draw Arc with default values of options. Endpoint will decide the radius of Arc. This Arc segment is the tangent to the previous polyline segment.


b. Angle: Specify angle with reference to base line (default x-axis) between start point of an arc and would be endpoint of an arc. Positive number creates counterclockwise and negative number creates clockwise arc segments. This will prompt following options:-
i. Endpoint of Arc: Specify endpoint to draw arc.
ii. Center: Specify center point of an arc.


(Positive Angle Anticlockwise +45o) (Negative Angle Clockwise -45o)
iii. Radius: Specify radius of an arc. After that it will prompt for direction of a segment.


c. Center: Specify the center of an arc.
i. Endpoint of arc: Specify endpoint to draw arc according to specified center point.


ii. Angle: Specify angle with reference to the base line to determine clockwise or counterclockwise arc segment. .(See example Pline->arc->Angle)
iii. Length: Specify the chord length of arc segment. If the previous segment is an arc then the new segment is drawn tangent to the previous arc segment.
d. Close: Draw an arc segment from the endpoint of a last segment to the start point of a first segment. You can use this option after creating two or more segments.


Note: Arc segment is used to close the polyline. If you need line segment to close, first change from arc mode to line mode by using ‘Line’ option.
e. Direction: Specify the tangent direction to decide the starting direction of arc.


Note: press ESC key to set more options instead of giving endpoint.
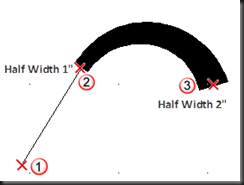
f. Halfwidth: Specify line width from center of the polyline like radius of a circle. The resulting line width is the double of halfwidth. You can specify different starting and ending line width. The ending halfwidth becomes the uniform halfwidth of all subsequent segments until the halfwidth changes for next time.

g. Line: Exits the arc options and return the main PLINE options.

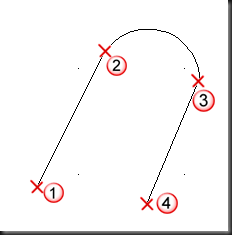
h. Radius: Specify the radius of the arc segment.

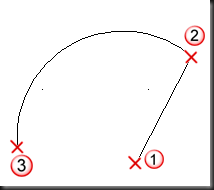
i. Second pt: Gives the facility to draw arc using three points. Specify second point and third point to complete the arc segment.


j. Undo: Removes the most recent arc segment from the sequence. If you repeat the option this will remove arc segments one by one in reverse order.(see example Line->Undo)
k. Width: Specify the line width of arc to be drawn. Just like halfwidth , this option also set different starting and ending line width.(See example Pline->arc->Halfwidth)
4) Close: When you create two or more contiguous segments then this prompt is appear. This option creates a ployline segment from endpoint of last polyline segment to start point of first polyline segment.(See example Line->Close)
5) Halfwidth: Specify line width from center of the polyline like radius of a circle. The resulting line width is the double of halfwidth. You can specify different starting and ending line width. The ending halfwidth becomes the uniform halfwidth of all subsequent segments until the halfwidth changes for next time. .(See example Pline->arc->Halfwidth)
6) Length: Draw a line segment of specified length. For the first length line segment angle is determined by crosshair position and for the angle for next line segment is remaining same as of previous polyline segment. If the previous segment is an arc, the new polyline segment is drawn tangent to the arc segment.


7) UNDO: Remove the most recent polyline segment from the contiguous polyline sequence. If you repeat this option multiple times then you can remove polyline segments in reverse order. .(see example Line->Undo)
8) Width: Specify the polyline width to be drawn. Just like halfwidth , this option also set different starting and ending line width. .(See example Pline->arc->Halfwidth)
Here is a quick recap of all the steps required before using drawing tools to draw a plan.
1) Every 2D drawing has a width and length. Width is represented by X-axis and length is represented by Y-axis.
2) The distance and angle is measured in specified unit. Change it to Architectural using UNIT command.
3) Specify the maximum size in width and length covered by boundary of a plot area. Use LIMIT command to set the drawing size.
4) Set GRID dots to ON to visualize the drawing area.
Note: Use Zoom command then type ALL at command prompt to view entire drawing area up to the limit on a screen. We will discuss ZOOM command later.
How to Draw in AutoCAD
AutoCAD provide a “Draw” panel in Home Ribbon which contain basic and Advanced drawing tools.


(a)Draw Panel (b) Expanded Draw Panel (c) Pin up expanded panel to lock the view
Note: “More tools” section is automatically hide when you are out of Draw panel. To retain this section on screen permanently, click pin up tool to change it in vertical position to lock the section.
Important: You don’t need to use tools if you are ready to remember the names of drawing commands. Just type the command name in command window to use it. This is the best way to get perfection in AutoCAD.
Basic Drawing Tools
1) How to Draw Line
Tool:Command: LINE


LINE command creates straight line segments. In this command you create a series of contiguous line segments by clicking on required location visually or by typing (X, Y, Z) coordinates on command prompt. Generally, Z point is always zero in 2D drawing, so there is no need to mention it in the coordinate. Draw lines are contiguous but not connected with each other, so, you can edit each line segment separately.
Command prompt options:
1) Specify first point: Type or pick a point on screen to specify start point of a line.
2) Specify next point: Type or pick a point on screen to specify end point of a line until you don’t want to stop draw lines.
3) Continue: This is the hidden prompt. When LINE command prompts for first point, press ENTER key to continue line drawing from endpoint of the most recently drawn line. If the most recent object drawn is arc then by pressing ENTER key, LINE command pick the endpoint of arc and draw a tangent to arc.


4) Close: When you create two or more contiguous segments then this prompt is appear. This option creates a line segment from endpoint of last line segment to start point of first line segment.


5) Undo: Remove the most recent line segment from the contiguous line sequence. If you repeat this option multiple times then you can remove line segments in reverse order.


(First Undo) (Second Undo) (Third Undo)
2) How to Draw Rectangle
Tool:Command: RECTANG


RECTANG command creates a rectangle of polylines (connected with each other and closed) by specifying two opposite corners. In this command you can specify rectangle parameters like length, width and rotation. You can also control the type of corners like fillet, chamfer or square.
Command prompt options:
Options available at the time of first point specification
1) Specify first corner point: Type or Pick a point to start rectangle.
2) Chamfer: Chamfer is the diagonal cut in two edges of a corner of rectangle.


Here ‘A’ (6”) is first chamfer distance and ‘B’ (4”) is second chamfer distance asked by this option. Set A and B, then draw rectangle to get chamfered rectangle. Specified chamfered distance is now default distance for all next drawn rectangle otherwise you have to reset the distance to ‘0’.
Note: If you don’t want to chamfer all corners then draw rectangle normally and use ‘CHAMFER’ command separately which is discussed later.
3) Elevation: Elevation for any object is the distance along Z-axis i.e. the height of the object from XY-plane or any reference point. This option is used in 3D drawing and can be viewed using 3D orbit view.
4) Fillet: Fillet is the round cut in two edges of a corner of rectangle.


Here ‘R’ is the radius of a circle used to make a rounded corner rectangle. Set radius and then draw a rectangle which is filleted rectangle.
5) Thickness: Add thickness to the rectangle to create a box like shape. This is viewed in 3D and useful for 3D drawing.
6) Width: Width of a rectangle line is the thickness of the line.


Options available at the time of Second point specification
1) Specify other corner point: Type or Pick a point to finish rectangle.
2) Area: Specify area of a rectangle with any one from Length or Width. In filleted or chamfered rectangle this option count only used area and exclude cutting part. For example if you specify 864 square inches as area of a rectangle and 3’ of length then you create a rectangle of 3’x2’ in width and length.


3) Dimensions: Specify Length and Width to create a rectangle from specified first corner point. After specifying dimensions, choose direction of second corner point.


4) Rotation: Specify Angle with reference to X-axis (default) to get rotated rectangle.


3) How to Draw Polyline
Tool:Command: PLINE


Polyline is a very important line object in 2D and 3D drawing. Polylines are contiguous and connected sequence of straight and/or curved (arc) line object. In connected polylines if you change length of any segment then it will affect connected segment also. All connected polyline segments are behaves like a single object. Polyline segments can have different start and end line width.
Command prompt options:
1) Specify start point: Type or pick a point to start drawing polyline.
2) Specify next point: Type or pick a point on screen to specify end point of a polyline until you don’t want to stop drawing polylines.
3) Arc: This option add arc segment to the polyline using following command prompt options:-

a. Endpoint of Arc: Specify point to draw Arc with default values of options. Endpoint will decide the radius of Arc. This Arc segment is the tangent to the previous polyline segment.


b. Angle: Specify angle with reference to base line (default x-axis) between start point of an arc and would be endpoint of an arc. Positive number creates counterclockwise and negative number creates clockwise arc segments. This will prompt following options:-
i. Endpoint of Arc: Specify endpoint to draw arc.
ii. Center: Specify center point of an arc.


(Positive Angle Anticlockwise +45o) (Negative Angle Clockwise -45o)
iii. Radius: Specify radius of an arc. After that it will prompt for direction of a segment.


c. Center: Specify the center of an arc.
i. Endpoint of arc: Specify endpoint to draw arc according to specified center point.


ii. Angle: Specify angle with reference to the base line to determine clockwise or counterclockwise arc segment. .(See example Pline->arc->Angle)
iii. Length: Specify the chord length of arc segment. If the previous segment is an arc then the new segment is drawn tangent to the previous arc segment.
d. Close: Draw an arc segment from the endpoint of a last segment to the start point of a first segment. You can use this option after creating two or more segments.


Note: Arc segment is used to close the polyline. If you need line segment to close, first change from arc mode to line mode by using ‘Line’ option.
e. Direction: Specify the tangent direction to decide the starting direction of arc.


Note: press ESC key to set more options instead of giving endpoint.
f. Halfwidth: Specify line width from center of the polyline like radius of a circle. The resulting line width is the double of halfwidth. You can specify different starting and ending line width. The ending halfwidth becomes the uniform halfwidth of all subsequent segments until the halfwidth changes for next time.


g. Line: Exits the arc options and return the main PLINE options.


h. Radius: Specify the radius of the arc segment.


i. Second pt: Gives the facility to draw arc using three points. Specify second point and third point to complete the arc segment.


j. Undo: Removes the most recent arc segment from the sequence. If you repeat the option this will remove arc segments one by one in reverse order.(see example Line->Undo)
k. Width: Specify the line width of arc to be drawn. Just like halfwidth , this option also set different starting and ending line width.(See example Pline->arc->Halfwidth)
4) Close: When you create two or more contiguous segments then this prompt is appear. This option creates a ployline segment from endpoint of last polyline segment to start point of first polyline segment.(See example Line->Close)
5) Halfwidth: Specify line width from center of the polyline like radius of a circle. The resulting line width is the double of halfwidth. You can specify different starting and ending line width. The ending halfwidth becomes the uniform halfwidth of all subsequent segments until the halfwidth changes for next time. .(See example Pline->arc->Halfwidth)
6) Length: Draw a line segment of specified length. For the first length line segment angle is determined by crosshair position and for the angle for next line segment is remaining same as of previous polyline segment. If the previous segment is an arc, the new polyline segment is drawn tangent to the arc segment.


7) UNDO: Remove the most recent polyline segment from the contiguous polyline sequence. If you repeat this option multiple times then you can remove polyline segments in reverse order. .(see example Line->Undo)
8) Width: Specify the polyline width to be drawn. Just like halfwidth , this option also set different starting and ending line width. .(See example Pline->arc->Halfwidth)
No comments:
Post a Comment