1) Transparent Commands
In AutoCAD you can use many commands transparently. That means you can enter them on the command line while another command is active. To use a command transparently, enter an apostrophe (‘) before entering the command. After you complete the transparent command, the original command resumes.
2) Direct Distance Entry
This is the most helpful feature available in AutoCAD. Using this facility you can specify the desired length of any object directly without calculating its coordinates. To do so you must place the mouse pointer in desired direction. This feature uses the mouse pointer direction to draw the desired length object.


3) Absolute Coordinates
a) Cartesian Coordinates: Cartesian Coordinates are specified in X and Y values (X,Y). By default, X and Y values are measured from origin (0,0). For example (4’,3’) means a point is located at 4’ distance on X-axis and 3’ distance on Y-axis from origin. This is called absolute coordinates. This specification is useful when you know the point distance from origin.
b) Polar Coordinates: Polar coordinates are specified in distance and angle from default axis. For example 4’<30 means point is located at 4’ distance from origin on 30 degree angle.

4) Relative Coordinates
Many times you only know the required point distance from any other point and not from origin. In this case, if you want to specify that point within any command then you have to calculate the distance of that point from origin. AutoCAD provide the two features help you to find that point relative to any other point (Reference point).a) Relative Coordinate System: In this coordinate system you have to specify the distance in X and Y from last working point but prefix ‘@’ symbol before coordinate value. For example (@4’,3’) means a point is located at 4’ distance on X-axis and 3’ distance on y-axis from last working point.
Note: Your base point must be the last working point otherwise you have to use ID command to designate it last working point or you have to use following utility.


b) ‘From’ feature: This is the utility used within any other command that requires a point. This utility helps to find the relative point based on any specific base point. In this utility you can refer any point and it may not be the last working point.


10) How to Draw SPLINE (Smooth Polyline)
Tool:Command: SPLINE


SPLINE is the smooth polyline. This command creates a smooth curve that passes through First point or near control vertices.
Command prompt options:
1) Method: There are two methods to create spline in AutoCAD. Using this option select SPLINE draw method from Fit points or Control vertices.
a. Fit point method: In this method curve must passes from specified points.
Following prompts are displayed when we choose ‘Fit’ method:
i) Specify first point: Specify first point to start curved line
ii) Knots: Specifies the knot parameter which affects the shape of the curve when it passes through a Fit point. Following options are available:
· Chord
· Square Root
· Uniform

iii) Enter next point: Specify next fit point to add curve segments until you press ENTER key.
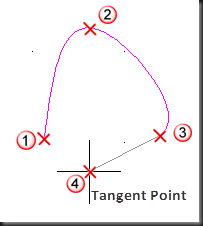
iv) Start Tangency: Specifies tangent direction before specifying second point to create curve. First curve segment follow the specified tangent point.


v) End Tangency: Specifies tangent direction for last curve segment to determine its shape. After specifying this tangent, command finishes drawing spline.

Example-1 Example-2


Note: Two different tangent point positions change the shape of curve segment.
vi) Tolerance: Tolerance adds the flexibility to create smooth curved segments. In this option curve segments may allow a distance from fit points up to specified Tolerance distance.


Example-1: Tolerance=0 Example-2: Tolerance=1
vii) Undo: Removes last specified point.
viii) Close: This option add curve segment from Last point to First point according to specified tangent (End Tangency).
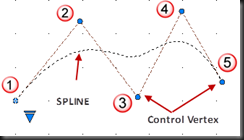
b. CV point method: In this method curve passes from near of the specified point. This point is called control vertex (CV).


Following prompts are displayed when we choose ‘CV’ point method:
i) Specify first point: Specify first point to start curved line.
ii) Enter next point: Specify next control vertex to add curve segments until you press the ENTER key.
iii) Degree: Sets the maximum number of bends you can get in each span. The degree can be 1, 2 or 3. There will be one more control vertex than the number of degree, so a degree 2 spline has 3 control vertices.


iv) Undo: Removes last specified point.
v) Close: This option add curve segment from Last point to First point.
2) Object: Convert polyline object into spline. By default polyline can be converted into spline using CV method. This method generate a spline-fit (Frame) polyline from existing polyline and convert into spline according to frame. Spline-fit polyline now becomes control path for new spline and vertices of selected polylines become control vertices (CV) of spline. Spline-fit polyline passes through the first and last control points unless the original polyline was closed. The curve is pulled toward the other points but does not necessarily pass through them. The more control points you specify in a particular part of the frame, the more pull they exert on the curve. If the original polyline included arc segments, they are straightened when the spline's frame is formed. If the frame has width, the resulting spline tapers smoothly from the width of the first vertex to the width of the last vertex. All intermediate width information is ignored.


Note: If you need Fit method spline instead of CV method spline than convert resulting spline using SPLINEDIT command and select “Fit Data” option. You cannot convert polyline directly into Fit method spline, it will give error “Only spline fitted polylines can be converted to splines”.
11) How to Draw Construction Line
Tool:Command: XLINE


XLINE used to create a line of infinite length. These lines are used as a reference line in a plan and can be used for trimming, aligning boundaries.
Command prompt options:
1) Specify a point: Specify the location of the infinite line using two points through which it passes.
2) Specify through point: specify through points to create multiple reference line until you press the ENTER key.
3) Hor: Creates a horizontal infinite line through a specified point.


4) Ver: Creates a vertical infinite line through a specified line.


5) Ang: Create an infinite line at a specified angle from default reference x-axis or from specified reference line.
a. Angle of xline: Specify the angle of xline with reference to default axis.


b. Reference: Specifies the angle from a selected reference line.


6) Bisect: Creates an xline that passes through the selected angle vertex and bisects the angle between the first and second line.


7) Offset: Creates an infinite parallel to another line object.
a. Offset distance: Specifies the distance from the selected line object.
b. Specify the side to offset: Specify a point in required side of line object.


12) How to Draw Ray Line
Tool:Command: RAY


Creates a line that starts from specified point and continues to infinity through next specified point (Through point). The prompt for a through point is redisplayed so you can create multiple ray lines from same start point.
No comments:
Post a Comment